Developers use GitHub together with a number of other platforms, to communicate with each other on issues, pull requests, deployment statuses, and other updates. We want to integrate GitHub with other platforms to make it easier for developers and teams to collaborate around their projects from whatever context they work in. We’ve had a GitHub + Slack integration for years, and today we are excited to announce that we’re expanding our portfolio, with a new GitHub + Microsoft Teams integration, now available in public beta.
To get access to this new integration, head over to the Microsoft Teams app store and install GitHub (Preview), or directly install from here.
Getting started
There’s a lot to be excited about with this integration, including the ability to close/reopen issues and comment on issues/pull requests right in Teams. But, first things first, you’ll want to link your GitHub and Teams accounts. To link your accounts, authenticate to GitHub using a @github signin command.
Let’s see what else you can do with this integration!
Customizing your experience
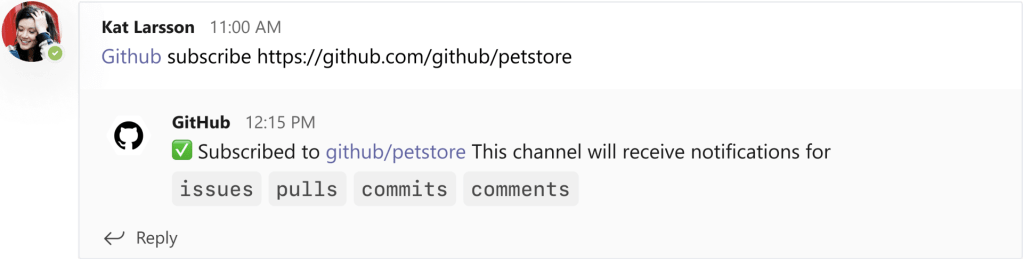
Get notifications for only the organizations and repositories you care about. You can subscribe to get notifications for an organization or repository’s activity using the @github subscribe [organization]/[repository] command. To unsubscribe to notifications from a repository, use @github unsubscribe [organization]/[repository]
Viewing current details
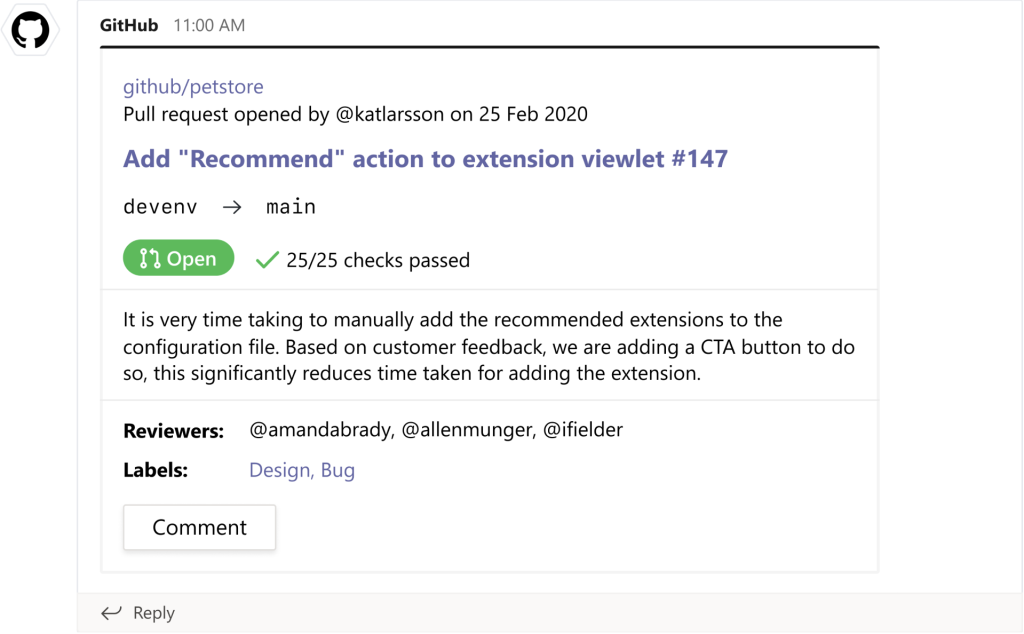
Your team can see all the essentials details on a GitHub activity posted in a Microsoft Teams channel. The notification card you see for any pull request or issue always reflects the current state from GitHub along with other metadata like checks, descriptions, labels, assignees, and reviewers.
Turning conversations into actions
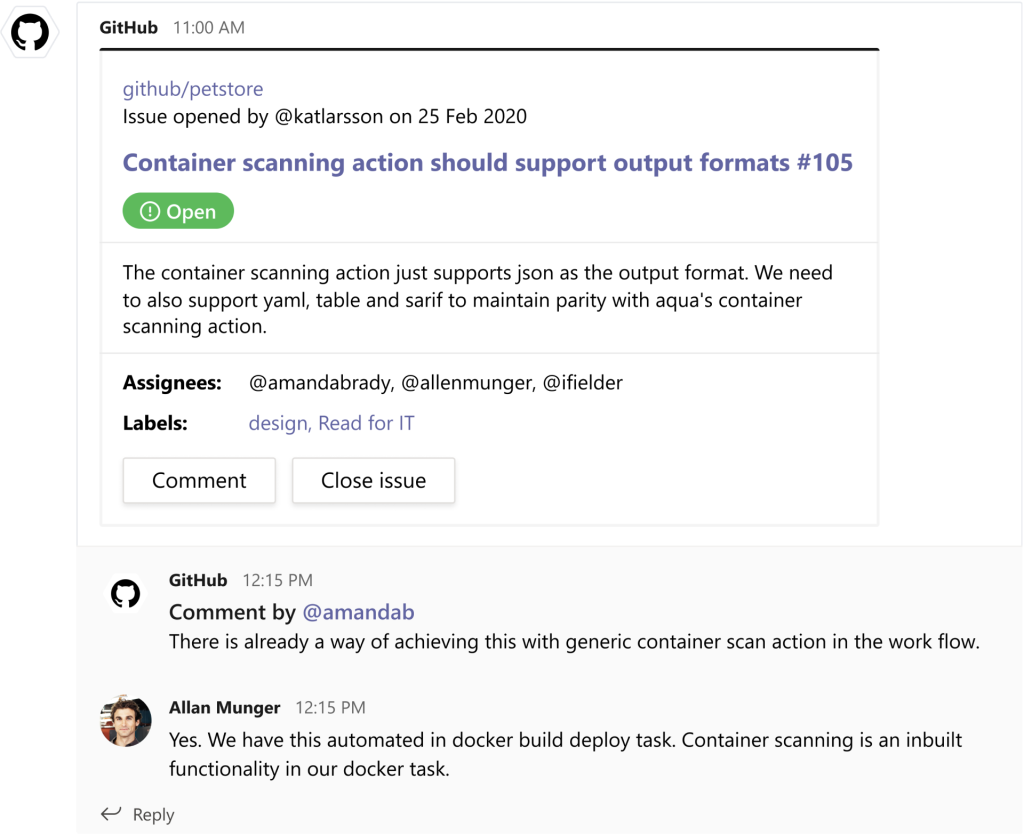
Any new event that happens on a pull request or issue (like comment/review/close/merge etc.) is added as a reply to the parent card. This helps in retaining the context and promotes collaboration. And you can turn discussions into actions on GitHub, directly from Teams. You can perform actions like:
Open a new issue
Close and reopen existing issues
Comment on issues and pull requests
Unfurling your links
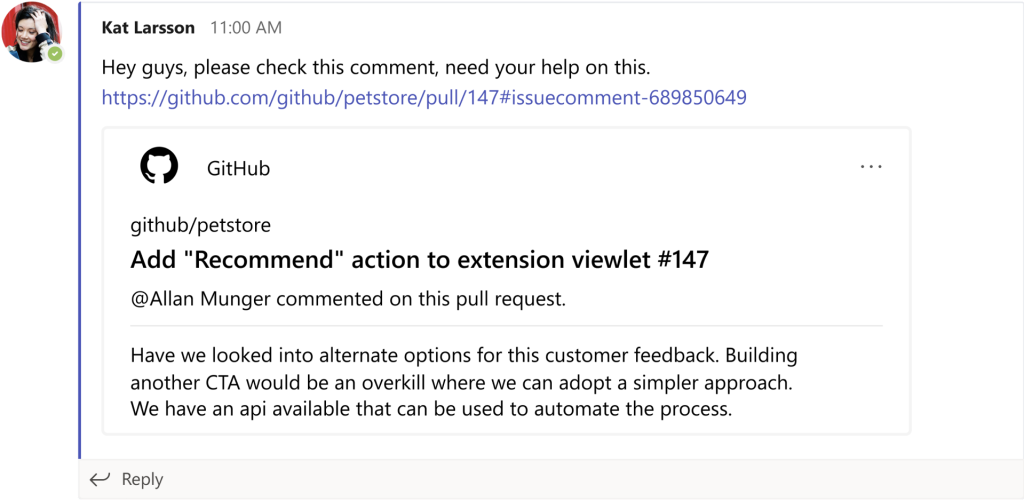
When you share links to GitHub activities in the channel, more details are automatically extracted and shown as a preview in your Teams channel. Check it out:
Staying in touch
We’re looking forward to hearing your feedback on the new integration. Please share any feedback you might have here. For more information, visit teams.github.com and/or our product documentation page today.
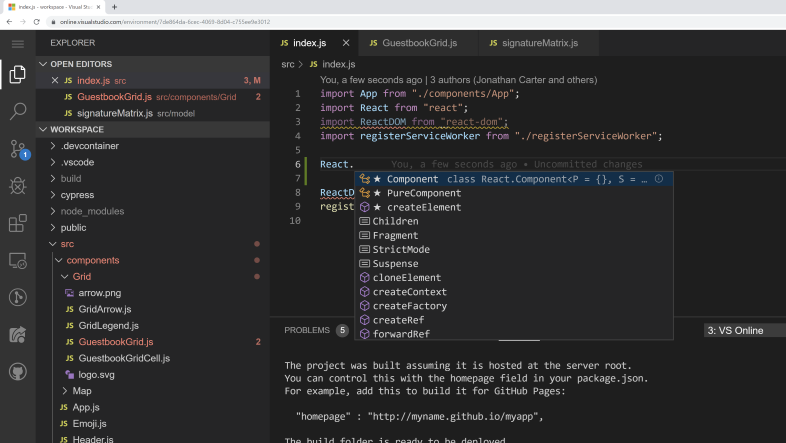
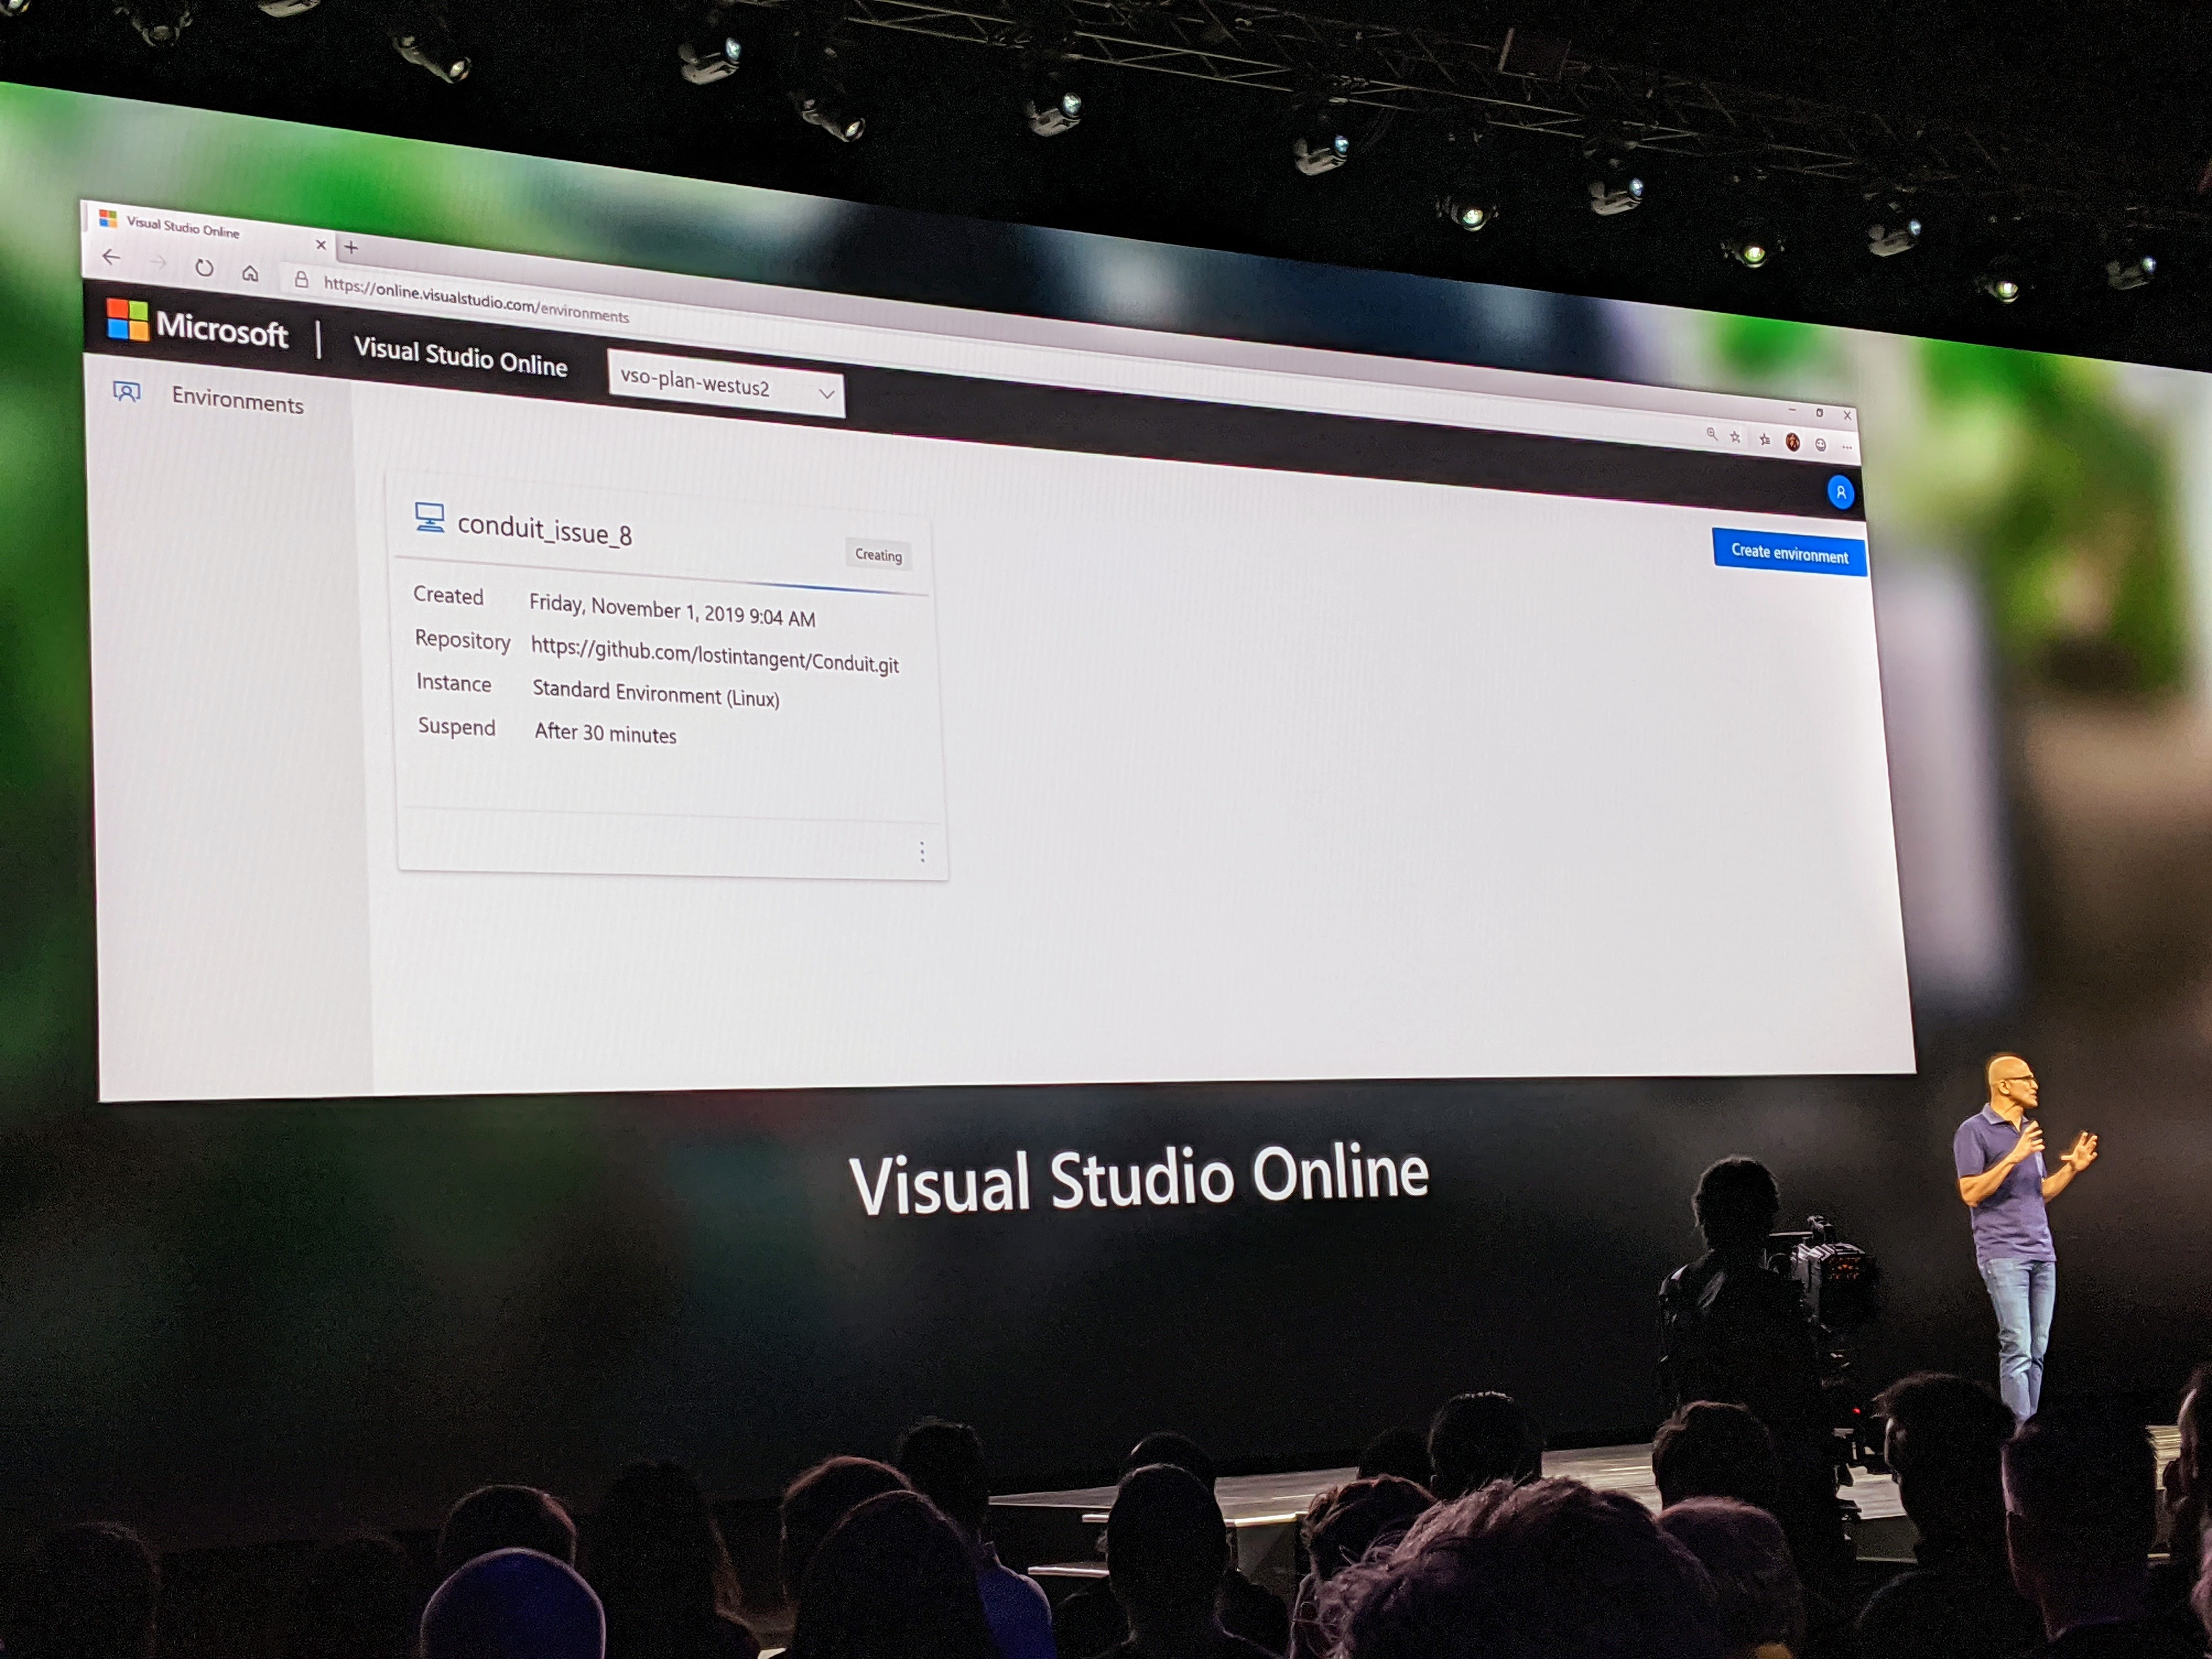
About a year ago, Microsoft launched Visual Studio Online, its online code editor based on the popular Visual Studio Code project. It’s basically a full code editor and hosted environment that lives in your browser.
Today, the company announced that it is changing the name of this service to Visual Studio Codespaces. It’s also dropping the price of the service by more than 50% and it’s giving developers the option to run it on relatively low-performance virtual machines that will start at $0.08 per hour.
In today’s announcement, Microsoft’s Scott Hanselman points out that the company learned that most developers who used Visual Studio Online thought of it as being much more than simply an editor in the browser.
“To better align with that sentiment, and the true value of the service, we’re renaming Visual Studio Online to Visual Studio Codespaces. (It’s true what they say, naming is hard!) Do you want a great experience working on your long-term project? Do it in a Codespace. Need to quickly prototype a new feature or perform some short-term tasks (like reviewing pull requests)? Create a Codespace! Your Codespaces are simply the most productive place to code.”
The new pricing will go into effect on May 19, the first day of Microsoft’s (virtual) Build developer conference. These are pretty significant price drops, down from $0.45 per hour to $0.17 for a machine with 4 cores and 8 GB of memory, for example (you also incur some relatively minor storage costs of $0.0088 for using a 64 GB SDD, too).
Hanselman also points out that a lot of developers don’t need quite that much power, so the company is now introducing a Basic plan with a 2-core machine and 4 GB of RAM for $0.08 per hour. Best I can tell, these will go live for around $0.24 per hour today and then see a price cut on May 19, too. Why not launch it at the reduced price? Only Microsoft knows, so we asked and will update this post once they tell us.
Typically, this is the kind of announcement Microsoft would make at its annual Build developer conference. And while some other companies have decided to fully scrap their events and aren’t even hosting a virtual conference, Microsoft is moving full steam ahead with its Build conference in the middle of May. I expect we’ll hear more about how that event will play out in the near future.
The alpha version of Bootstrap 4 has been released on the 19th of August 2015 and it brought a lot of improvements such as flexbox, a better grid system, cards, improved navbars and switching Sass over Less. Additionally it took more than 2 years to bring it to a stable version on January 18th, 2018.
With that being said let’s analyze everything we know about Bootstrap 5’s release date and improvements.
Bootstrap 5 release date
Progress is looking really good on the official Github project tracking board with 686 tasks being shipped and roughly 35 more pending or being in review. Taking in consideration that they’re already working on the alpa-2 and alpha-3 versions, we can expect Bootstrap 5 to be released in late spring this year.
What’s new?
Some of the major changes will be removing jQuery altogether as a dependency, adding back custom icons powered by SVG (which they already launched last year), some CSS & Javascript simplifications, fixes and improvements and removing support for IE 10.
Here’s a list of all the expected changes:
Removing jQuery
Dropping support for IE 10
Custom SVG icon library
Switching to Hugo from Jekyll
Major Javascript updates
Minor CSS and class updates and fixes
Removing jQuery ?
This shouldn’t be a surprise as jQuery has been losing ground in times when frameworks such as React.js, Vue.js and Angular.js are being used by an increasing amount of developers across the world. Additionally many of jQuery’s querying features can be done by just writing vanilla Javascript query selector nowadays.
I believe this is a good time to do it as jQuery has served its purpose for a long time. Removing this dependency will lighten the project’s size considerably.
Dropping IE 10 support ?
Internet Explorer 10 accounts for less than 1% of global browser usage and considering that since 2016 Microsoft ended support for version older and including 10 this is an understandable change.
Custom SVG icon library ?
Personally I was a bit disappointed with the lack of an integrated icon library for the 4th version. We usually use Font Awesome or custom SVG icons in our products, but we may soon change that.
With the 5th version there’s a brand new SVG powered icon library coming created by Mark Otto. What’s even better is that it has already been released in December and you can use them in your projects right now!
Switching to Hugo from Jekyll ?
Jekyll has been around for a long time as a very popular Static Site Generator, however in recent years Hugo has been deemed to be the fastest and most recommended one. We see this change similar to what they did with the 4th version of Bootstrap by switching from Less to Sass.
Javascript & CSS
We expect huge changes to the core Javascript file as jQuery will no longer be part of the project. Expect going through a new documentation regarding event listeners and options. Regarding the CSS there are no major changes but we assume there will be some optimizations, class updates and general fixes.
In conclusion Bootstrap 5 should be faster, simpler and better looking. Don’t expect huge changes in terms of the base set of components, but rather appreciate the time it will save you developing beautiful user interfaces and the shorter loading time for the users.
Learn what Dependency Injection and IoC are and what .NET Core provides you to support them.
Dependency Injection is one of the most known techniques that help you to create more maintainable code. .NET Core provides you with extensive support to Dependency Injection, but it may not always be clear how to apply it. This tutorial will try to clarify the various Dependency Injection concepts and will introduce you to the support provided by .NET Core.
The Dependency Problem
Have you ever had to change a lot of code because of a new simple requirement? Have you ever had a hard time trying to refactor part of an application? Have you ever been in trouble writing unit tests because of components that required other components?
If you answered yes to any of these questions, maybe your codebase suffers from dependency. It’s a typical disease of the code of an application when its components are too coupled. In other words, when a component depends on another one in a too-tight way. The main effect of component dependency is the maintenance difficulty of the code, which, of course, implies a higher cost.
A dependency example
Take a look at a typical example of code affected by dependency. Start by analyzing these C# classes:
using System;
using System.Collections.Generic;

namespace OrderManagement
{
    public class Order
    {
        public string CustomerId { get; set; }
        public DateTime Date { get; set; }
        public decimal TotalAmount { get; set; }
        public List<OrderItem> Items { get; set; }

        public Order()
        {
            Items = new List<OrderItem>();
        }
    }

    public class OrderItem
    {
        public string ItemId { get; set; }
        public decimal Quantity { get; set; }
        public decimal Price { get; set; }
    }
}
This code defines two classes, Order and OrderItem, that represent the order of a customer. The orders are managed by the OrderManager class implemented as follows:
using System.Threading.Tasks;

namespace OrderManagement
{
    public class OrderManager
    {
        public async Task<string> Transmit(Order order)
        {
            var orderSender = new OrderSender();

            return await orderSender.Send(order);
        }
    }
}
The OrderManager class implements the Transmit() method, which sends the order to another service to process. It relies on the OrderSender class to actually send the order received as an argument.
This is the code implementing the OrderSender class:
using System.Net.Http;
using System.Text;
using System.Text.Json;
using System.Threading.Tasks;

namespace OrderManagement
{
    public class OrderSender
    {
        private static readonly HttpClient httpClient = new HttpClient();

        public async Task<string> Send(Order order)
        {
            var jsonOrder = JsonSerializer.Serialize<Order>(order);
            var stringContent = new StringContent(jsonOrder, UnicodeEncoding.UTF8, "application/json");

            //This statement calls a not existing URL. This is just an example...
            var response = await httpClient.PostAsync("https://mymicroservice/myendpoint", stringContent);

            return response.Content.ReadAsStringAsync().Result;

        }
    }
}
As you can see, the Send() method of this class serializes the order and send it via HTTP POST to a hypothetical microservice that will process it.
The code shown here is not meant to be realistic. It is just a rough example.
What happens if you need to change the way of sending an order? For example, suppose you also want to send orders via e-mail or to send them to another microservice that uses gRPC instead of HTTP. Also, how comfortable do you feel to create a unit test for the OrderManager class?
Since OrderManager depends on OrderSender, you will be forced to change in some way both classes to support multiple sender types. Changes in the lower-level component (OrderSender) may affect the higher-level component (OrderManager). Even worse, it will be almost impossible to automatically test the OrderManager class without risking to mess your code.
This is just a simple study case. Think of the impact that dependency may have in a more complex scenario with many dependent components. That could really become a huge mess.
The Dependency Inversion Principle
The last of the SOLID principles proposes a way to mitigate the dependency problem and make it more manageable. This principle is known as the Dependency Inversion Principle and states that:
High-level modules should not depend on low-level modules. Both should depend on abstractions
Abstractions should not depend on details. Details should depend on abstractions.
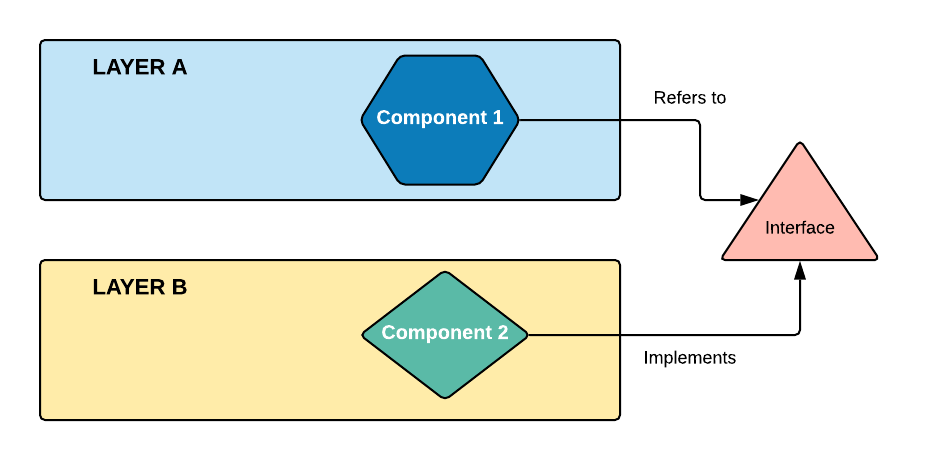
You can translate the two formal recommendations as follows: in the typical layered architecture of an application, a high-level component should not directly depend on a lower-level component. You should create an abstraction (for example, an interface) and make both components depend on this abstraction.
Translated in a graphical way, it appears as shown by the following picture:
Of course, all of this may seem too abstract. Well, this article will provide you with examples to clarify the concepts about dependency and the techniques to mitigate it. While the general concepts are valid for any programming language and framework, this article will focus on the .NET Core framework and will illustrate the infrastructure it provides you to help in reducing component dependency.
A trip in the dependency lingo
Before exploring what .NET provides you to fight the dependency disease of your code, it’s necessary to put some order in the terminology. You may have heard many terms and concepts about code dependency, and some of them seem to be very similar and may have been confusing. Well, here is an attempt to give a proper definition of the most common ones:
Dependency Inversion Principle: it’s a software design principle; it suggests a solution to the dependency problem but does not say how to implement it or which technique to use.
Inversion of Control (IoC): this is a way to apply the Dependency Inversion Principle. Inversion of Control is the actual mechanism that allows your higher-level components to depend on abstraction rather than the concrete implementation of lower-level components.Inversion of Control is also known as the Hollywood Principle. This name comes from the Hollywood cinema industry, where, after an audition for an actor role, usually the director says, don’t call us, we’ll call you.
Dependency Injection: this is a design pattern to implement Inversion of Control. It allows you to inject the concrete implementation of a low-level component into a high-level component.
IoC Container: also known as Dependency Injection (DI) Container, it is a programming framework that provides you with an automatic Dependency Injection of your components.
Dependency Injection approaches
Dependency Injection is maybe the most known technique to solve the dependency problem.
You can use other design patterns, such as the Factory or Publisher/Subscriber patterns, to reduce the dependency between components. However, it mostly derives on the type of problem your code is trying to solve.
As said above, it is a technique to providing a component with its dependencies, preventing the component itself from instantiating by themselves. You can implement Dependency Injection on your own by creating instances of the lower-level components and passing them to the higher-level ones. You can do it using three common approaches:
Constructor Injection: with this approach, you create an instance of your dependency and pass it as an argument to the constructor of the dependent class.
Method Injection: in this case, you create an instance of your dependency and pass it to a specific method of the dependent class.
Property Injection: this approach allows you to assign the instance of your dependency to a specific property of the dependent class.
.NET Core and the Dependency Injection
You can implement Dependency Injection manually by using one or more of the three approaches discussed before. However, .NET Core comes with a built-in IoC Container that simplifies Dependency Injection management.
The IoC Container is responsible for supporting automatic Dependency Injection. Its basic features include:
Registration: the IoC Container needs to know which type of object to create for a specific dependency; so, it provides a way to map a type to a class so that it can create the correct dependency instance.
Resolution: this feature allows the IoC Container to resolve a dependency by creating an object and injecting it into the requesting class. Thanks to this feature, you don’t have to instantiate objects manually to manage dependencies.
Disposition: the IoC Container manages the lifetime of the dependencies following specific criteria.
You will see these features in action in a while. But before this, some basic information is needed.
The .NET Core built-in IoC Container implements the IServiceProvider interface. So if for some reason, you want to create your own IoC Container, you should implement this interface. In .NET Core, the dependencies managed by the container are called services. You have two types of services:
Framework services: these services are part of the .NET Core framework; some examples of framework services are IApplicationBuilder, IConfiguration, ILoggerFactory, etc.
Application services: these are the services that you create in your application; since the IoC doesn’t know them, you need to register them explicitly.
Dealing with Framework Services
As a .NET Core developer, you’ve already used the built-in IoC Container to inject framework services. Indeed, .NET Core heavily relies on it. For example, the Startup class in an ASP.NET application uses Dependency Injection extensively:
public class Startup
{
    public Startup(IConfiguration configuration)
    {
            // ... code ...
    }

    public void Configure(IApplicationBuilder app, IWebHostEnvironment env)
    {
            // ... code ...
    }

        // ... code ...
}
In this example, the Startup() constructor requires a configuration parameter implementing the IConfiguration type. Since IConfiguration is one of the framework service types, the IoC Container knows how to create an instance of it and inject it into the Startup class applying the Constructor Injection approach. The same applies to the Configure() method. Keep in mind, however, that only the following framework service types can be injected in the Startup() constructor and in the Configure() method of a standard ASP.NET application: IWebHostEnvironment, IHostEnvironment, and IConfiguration. This is a special case for framework services because you don’t need to register them.
Registering framework services
In general, you have to register services needed by your ASP.NET application in the ConfigureServices() method of the Startup class. This method has an IServiceCollection parameter representing the list of services your application depends on. Practically, the collection represented by this parameter allows you to register a service in the IoC Container. Consider the following example:
public class Startup
{
         // ... code ...
    public void ConfigureServices(IServiceCollection services)
    {
        services.AddAuthentication(options =>
            {
                options.DefaultAuthenticateScheme = JwtBearerDefaults.AuthenticationScheme;
                options.DefaultChallengeScheme = JwtBearerDefaults.AuthenticationScheme;
            });
    }

        // ... code ...
}
Here, you are registering a dependency for managing authentication for your application. In this specific case, you are using the extension methodAddAuthentication() with the parameters describing the authentication type you want to use. The framework provides extension methods to register and configure dependencies for the most common services. It also provides the Add() method to register generic dependencies, as in the following example:
public class Startup
{
         // ... code ...
    public void ConfigureServices(IServiceCollection services)
    {
        services.Add(new ServiceDescriptor(typeof(ILog), new MyLogger()));
    }

        // ... code ...
}
In this case, you are registering a log service implementing the ILog interface. The second parameter of the Add() method is an instance of the MyLogger class you have implemented in your project. As you may guess, this registration creates a singleton service, i.e., a single instance of the MyLogger class that will fulfill any requests coming from your application.
Service lifetimes
This single instance of your dependency will live for the entire lifetime of your application. This may be suitable for a service like a logger, but it is unacceptable for other services. The IoC Container allows you to control the lifetime of a registered service. When you register a service specifying a lifetime, the container will automatically dispose of it accordingly. You have three service lifetimes:
Singleton: this lifetime creates one instance of the service. The service instance may be created at the registration time by using the Add() method, as you saw in the example above. Alternatively, the service instance can be created the first time it is requested by using the AddSingleton() method.
Transient: by using this lifetime, your service will be created each time it will be requested. This means, for example, that a service injected in the constructor of a class will last as long as that class instance exists. To create a service with the transient lifetime, you have to use the AddTransient() method.
Scoped: the scoped lifetime allows you to create an instance of a service for each client request. This is particularly useful in the ASP.NET context since it allows you to share the same service instance for the duration of an HTTP request processing. To enable the scoped lifetime, you need to use the AddScoped() method.
Choosing the right lifetime for the service you want to use is crucial both for the correct behavior of your application and for better resource management.
Managing Application Services
Most of the concepts you learned from framework services are still valid for your application services. However, framework services are already designed to be injectable. The classes you define in your application need to be adapted to leverage Dependency Injection and integrate with the IoC Container.
To see how to apply the Dependency Injection technique, recall the order management example shown early in this article and assume that those classes are within an ASP.NET application. You can download the code of that application from this GitHub repository by typing the following command in a terminal window:
This command will clone in your machine just the branch starting-point of the repository. After cloning the repository, you will find the dependency-injection-dotnet-core folder on your machine. In this folder, you have the OrderManagementWeb subfolder containing the ASP.NET Core project with the classes shown at the beginning of this article. In this section, you are going to modify this project to take advantage of the Dependency Injection and the built-in IoC Container.
Defining the abstractions
As the Dependency Inversion Principle suggests, modules should depend on abstractions. So, to define those abstractions, you can rely on interfaces.
Add a subfolder to the OrderManagementWeb folder and call it Interfaces. In the Interfaces folder, add the IOrderSender.cs file with the following content:
// OrderManagementWeb/Interfaces/IOrderSender.cs

using System.Threading.Tasks;
using OrderManagement.Models;

namespace OrderManagement.Interfaces
{
    public interface IOrderSender
    {
        Task<string> Send(Order order);
    }
}
This code defines the IOrderSender interface with just one method, Send(). Also, in the same folder, add the IOrderManager.cs file with the following interface definition:
// OrderManagementWeb/Interfaces/IOrderManager.cs

using System.Threading.Tasks;
using OrderManagement.Models;

namespace OrderManagement.Interfaces
{
    public interface IOrderManager
    {
        public Task<string> Transmit(Order order);
    }
}
The above code defines the IOrderManager interface with the Transmit() method.
Depending on the abstractions
Once defined the abstractions, you have to make your classes depending on them instead of the concrete class instances. As a first step, you need to redefine the OrderSender class so that it implements the IOrderSender interface. You also rename the class into HttpOrderSender to point out that this implementation sends the order via HTTP. So, open the OrderSender.cs file in the Managers folder and replace its content with the following:
// OrderManagementWeb/Managers/OrderSender.cs

using System.Net.Http;
using System.Text;
using System.Text.Json;
using System.Threading.Tasks;
using OrderManagement.Interfaces;
using OrderManagement.Models;

namespace OrderManagement
{
    public class HttpOrderSender : IOrderSender
    {
        private static readonly HttpClient httpClient = new HttpClient();

        public async Task<string> Send(Order order)
        {
            var jsonOrder = JsonSerializer.Serialize<Order>(order);
            var stringContent = new StringContent(jsonOrder, UnicodeEncoding.UTF8, "application/json");

            //This statement calls a not existing URL. This is just an example...
            var response = await httpClient.PostAsync("https://mymicroservice.lan/myendpoint", stringContent);

            return response.Content.ReadAsStringAsync().Result;

        }
    }
}
Now, you need to redefine also the OrderManager class so that it implements the IOrderManager interface. Open the OrderManager.cs file in the Managers folder and replace its content with the following:
// OrderManagementWeb/Managers/OrderManager.cs

using System.Threading.Tasks;
using OrderManagement.Interfaces;
using OrderManagement.Models;

namespace OrderManagement
{
    public class OrderManager : IOrderManager
    {
        private IOrderSender orderSender;

        public OrderManager(IOrderSender sender)
        {
            orderSender = sender;
        }

        public async Task<string> Transmit(Order order)
        {
            return await orderSender.Send(order);
        }
    }
}
You may notice that, differently from the previous version of the class, the Transmit() method no longer creates an instance of the OrderSender class. The dependency is now accessed via the class constructor.
With these changes, you broke the dependency between the OrderManager and the HttpOrderSender classes. Now, the OrderManager depends on the IOrderSender interface, i.e., its abstraction.
Registering the dependencies
Now you need to tell the IoC Container how to manage the dependencies based on the abstraction you have defined. In other words, you need to register the dependencies. As said, this registration happens in the Startup class of the project. So, open the Startup.cs file and replace the ConfigureServices() method with the following:
// OrderManagementWeb/Startup.cs

public class Startup
{
    // ...code ...

        public void ConfigureServices(IServiceCollection services)
        {
            services.AddControllers();

            services.AddScoped<Interfaces.IOrderSender, HttpOrderSender>();
            services.AddScoped<Interfaces.IOrderManager, OrderManager>();
        }

    // ...code ...

}
As you can see, you registered the dependencies by using the generic version of the AddScoped() method. Here you are asking the IoC Container to create an instance of the HttpOrderSender class whenever a request for the IOrderSender type is detected. Similarly, it should create an instance of the OrderManager class when theIOrderManager type is requested.
Note that even the AddController() method is an extension method provided by Microsoft.Extensions.DependencyInjection library that registers services for the Web API controllers.
Injecting the dependencies
Now it’s time to actually use all these dependencies. So, open the OrderController.cs file in the Controllers folder and replace its content with the following code:
// OrderManagementWeb/Controllers/OrderController.cs

using Microsoft.AspNetCore.Mvc;
using OrderManagement.Interfaces;
using OrderManagement.Models;

namespace OrderManagement.Controllers
{
    [Route("api/[controller]")]
    [ApiController]
    public class OrderController : ControllerBase
    {
        private IOrderManager orderManager;

        public OrderController(IOrderManager orderMngr)
        {
            orderManager = orderMngr;
        }

        [HttpPost]
        public ActionResult<string> Post(Order order)
        {
            return Ok(orderManager.Transmit(order));
        }
    }
}
The new version of the Web API controller defines a private orderManager variable. Its value represents the instance of a service implementing the IOrderManager interface. The value of this variable is assigned in the constructor, which has an IOrderManager type parameter. With this parameter, the constructor is requesting the IoC Container a service instance of that type. The IoC Container searches in its service collection a registration that can satisfy this request and passes such an instance to the controller. But that’s not all. The IoC Controller also looks for other indirect dependencies and resolve them. This means that while creating the instance of the OrderManager class, the IoC Container also resolves its internal dependency on the IOrderSender abstraction. So you don’t have to worry about indirect dependencies: they are all resolved under the hood simply because the Web API controller declared to need a registered service.
As you noticed in these examples, the Constructor Injection is the default approach used by the IoC Container to inject dependencies in a class. If you want to use the Method Injection approach, you should request it explicitly by using the FromServices attribute. This example shows how you could use this attribute:
[HttpPost]
public ActionResult<string> Post([FromServices]IOrderManager orderManager)
{
    return Ok(orderManager.Transmit(order));
}
The third injection approach, the Property Injection, is not supported by the built-in IoC Container.
Dependency Injection in a Console Application
In the previous section, you implemented Dependency Injection for an ASP.NET Web application. You followed a few steps to register and get your dependencies automatically resolved by the built-in IoC Container. However, you may still feel something magic in the way it happens since the ASP.NET Core infrastructure provides you with some implicit behaviors. However, the Dependency Injection mechanism provided by the IoC Container is not just for Web applications. You can use it in any type of application.
In this section, you will learn how to leverage the IoC infrastructure in a console application, and some behaviors that may still look obscure will be hopefully clarified. So, move in the dependency-injection-dotnet-core folder you created when cloned the ASP.NET application and run the following command in a terminal window:
dotnet new console -o OrderManagementConsole
This command creates an OrderManagementConsole folder with a basic console application project. Now, copy in the OrderManagementConsole folder the Interfaces, Managers, and Models folders from the ASP.NET project you modified in the previous section. Basically, you are reusing the same classes related to the order management process you defined in the ASP.NET project.
After this preparation, the first step to enable your console application to take advantage of the IoC Container is to add the Microsoft.Extensions.DependencyInjection package to your project with the following command:
Then, you have to write some code to set up the IoC Container in your console application. Open the Program.cs file and replace its content with the following:
// OrderManagementConsole/Program.cs

using System;
using Microsoft.Extensions.DependencyInjection;
using OrderManagement;
using OrderManagement.Interfaces;
using OrderManagement.Models;

namespace OrderManagementConsole
{
    class Program
    {
        private static IServiceProvider serviceProvider;

        static void Main(string[] args)
        {
            ConfigureServices();

            var orderManager = serviceProvider.GetService<IOrderManager>();
            var order = CreateOrder();

            orderManager.Transmit(order);
        }

        private static void ConfigureServices()
        {
            var services = new ServiceCollection();

            services.AddTransient<IOrderSender, HttpOrderSender>();
            services.AddTransient<IOrderManager, OrderManager>();

            serviceProvider = services.BuildServiceProvider();
        }

        private static Order CreateOrder()
        {
            return new Order {
                CustomerId = "12345",
                Date = new DateTime(),
                TotalAmount = 145,
                Items = new System.Collections.Generic.List<OrderItem>
                {
                    new OrderItem {
                        ItemId = "99999",
                        Quantity = 1,
                        Price = 145
                    }
                }
            };
        }
    }
}
You see that the first operation in the Main() method of the Program class is configuring the services. Taking a look at the ConfigureServices() method, you see that this time you have to create the services collection explicitly. Then, you register your services with the transient lifetime: the dependencies should live just the time needed to manage the order. Finally, you get the service provider by using the BuildServiceProvider() method of the services collection and assign it to the serviceProvider private variable.
You use this service provider to get an instance of a registered service. For example, in the Main() method, you get an instance of the IOrderManager service type by using the GetService<IOrderManager>() method. From now on, you can use this instance to manage an order. Of course, as in the ASP.NET case, the orderManager instance has any indirect dependency resolved.
Finally, the CreateOrder() method just creates a dummy order to be passed to the Transmit() method of the order manager.
Summary
This article tried to clarify some concepts related to the Dependency Injection design pattern and focused on the infrastructure provided by .NET Core to support it. After introducing a few general definitions, you learned how to configure an ASP.NET Core application to use the built-in IoC container and register framework services. Then, you adapted the classes of an ASP.NET application to apply the Dependency Inversion Principle and discovered how to register your dependency in the IoC Container specifying the desired lifetime. Finally, you saw how to use the IoC Container even in a console application.
Images are critical. Whether it is marketing banners, product images or logos, it is impossible to imagine a website without images. Sadly though, images are often heavy files making them the single biggest contributor to the page bloat. According the HTTP Archive’s State of Images report, the median page size on desktops is 1511 KB and images account for nearly 45% (650 KB) of that total.
That said, it’s not like we can simply do away with images. They’re too important to the overall user experience. Instead, we need to make our web pages load really fast with them. In this guide, we will cover all of the ins and outs of lazy loading images, a technique that helps improve the time it takes for a web page to load by deferring image loads until they are needed.
Before we dive right in, here is a sample video that demonstrates the concept. In short, a gray placeholder box is rendered on the page until it scrolls into view—at which point the actual image loads in place of the box.
Chapter 1: What is Lazy Loading?
We often associate the word “lazy” with avoiding work as long as possible, or the sheer act of wanting to do nothing at all.
Similarly, lazy loading defers the loading of resources on the page as long as they are not needed. Instead of loading them right away, which is what normally happens, we allow them to load later.
Lazy Loading is a set of techniques in web and application development that defers the loading of resources on a page to a later point in time—when those resources are actually needed instead of loading them up front. These techniques help in improving performance, better utilization of the device’s resources and reducing associated costs.
The technique of lazy loading can be applied to just about any resources on a page. For example, even a JavaScript file can be held back if it is best not to load it initially. Same deal for an image—load it when we need it.
We will stick to lazy loading images in this guide, but it’s good to know it can be applied to other assets.
Chapter 2: Why Lazy Load at All?
If the user never scrolls to the point of the page that contains the image, then the user will never see that image. It also never loads in the first place because, hey, it was never needed.
You may already start to see how this benefits both you and the user. Here are two of the advantages we get with lazy loading.
Performance Gains
The obvious benefit is that we get smaller web pages that load faster. Lazy loading reduces the number of images that need to be loaded on a page up front. Fewer image requests mean fewer bytes to download. And fewer bytes to download means the page renders faster than if those bytes and requests were being made.
This ensures that any device on any network is able to download and process the remaining resources much faster. Hence, the time from request to render becomes smaller and the page becomes usable much earlier. Win-win!
Cost reduction
The second benefit is for you as a website administrator. Cloud hosting services, like Content Delivery Networks (CDNs) or web servers or storages, deliver images (or any asset for that matter) at a cost based on the number of bytes transferred. A lazy loaded image may never get loaded if the user never reaches it. Thus, you may reduce the total bytes delivered on the page and ultimately save yourself a few pennies in the process. This is especially true for users that instantly bounce off a page or interact only with the top portion of the content.
The reduction in bytes transferred from your delivery network or server reduces delivery costs. This will become more apparent as we explore lazy loading in the coming sections.
Just how much will you save? You can find out which images are a candidate for lazy loading and how many bytes you can save on the initial page load by using the Google Lighthouse audit tool. This has a section dedicated for offscreen images. You can also use ImageKit’s website analyzer to identify if your website uses lazy loading or not apart from other critical image related optimizations on your page.
Lazy loading is critical not only to good performance but also to deliver a good user experience. Since combining performance and user experience with lazy loading is important and challenging, we will continue to address this topic in more detail throughout this guide after we have looked at different ways to lazy load images.
Chapter 3: Lazy Loading Techniques for Images
There are two common ways that we load images to a page: the <img> tag and the CSS background-image property. We will first look at the more common of the two, the <img> tag and then move to CSS background images.
Lazy loading images in an image tag
Let’s start with the typical HTML markup for an image:
HTML:
<img src="/path/to/some/image.jpg" />
The markup for lazy loading images is pretty similar.
Step one is to prevent the image load up front. The browser uses the src attribute of the tag to trigger the image load. It doesn’t matter if it is the first or the 1,000th image in your HTML. If the browser gets the src attribute, it will trigger the image to be downloaded, regardless of whether it is in or out of current view.
To defer the load, put the image URL in an attribute other than src. Let’s say we specify the image URL in the data-src attribute of the image tag. Now that src is empty and the browser won’t trigger the image load:
Now that we’re preventing the image from loading, we need to tell the browser when to load it. Otherwise, it will never happen. For this, we check that as soon as the image (i.e. its placeholder) enters the viewport, we trigger the load.
There are two ways to check when an image enters the viewport. Let’s look at both of them with working code samples.
Method 1: Trigger the image load using Javascript events
This technique uses event listeners on the scroll, resize and orientationChange events in the browser. The scroll event is pretty clear cut because it watches where the user is on a page as scrolling occurs. The resize and orientationChange events are equally important. The resize event occurs when the browser window size changes, whereas orientationChange gets triggered when the device is rotated from landscape to portrait, or vice versa.
We can use these three events to recognize a change in the screen and determine the number of images that become visible on the screen and trigger them to load accordingly.
When any of these events occur, we find all the images on the page that are deferred and, from these images, we check which ones are currently in the viewport. This is done using an image’s top offset, the current document top position, and window height. If an image has entered the viewport, we pick the URL from the data-src attribute and move it to the src attribute and the image will load as a result.
Note that we will ask JavaScript to select images that contain a lazy class. Once the image has loaded, we’ll remove the class because it no longer needs to trigger an event. And, once all the images are loaded, we remove the event listeners as well.
When we scroll, the scroll event triggers multiple times rapidly. Thus, for performance, we are adding a small timeout to our script that throttles the lazy loading function execution so it doesn’t block other tasks running in the same thread in the browser.
Note that the first three images in this example are loaded up front. The URL is present directly in the src attribute instead of the data-src attribute. This is essential for a good user experience. Since these images are at the top of the page, they should be made visible as soon as possible. There’s no need to wait for JavaScript to load them.
Method 2: Trigger the image load using the Intersection Observer API
The Intersection Observer API is relatively new. It makes it simple to detect when an element enters the viewport and take an action when it does. In the previous method, we had to bind events, keep performance in mind and implement a way to calculate if the element was in the viewport or not. The Intersection Observer API removes all that overhead by avoiding the math and delivering great performance out of the box.
Below is an example using the API to lazy load images. We attach the observer on all the images to be lazy loaded. Once the API detects that the element has entered the viewport, using the isIntersecting property, we pick the URL from the data-src attribute and move it to the src attribute for the browser to trigger the image load. Once this is done, we remove the lazy class from the image and also remove the observer from that image.
If you compare the image loading times for the two methods (event listeners vs. Intersection Observer), you will find that images load much faster using the Intersection Observer API and that the action is triggered quicker as well— and yet the site doesn’t appear sluggish at all, even in the process of scrolling. In the method involving event listeners, we had to add a timeout to make it performant, which has a slightly negative impact on the user experience as the image load is triggered with a slight delay.
However, like any new feature, the support for Intersection Observer API is not available across all browsers.
This browser support data is from Caniuse, which has more detail. A number indicates that browser supports the feature at that version and up.
Desktop
Chrome
Opera
Firefox
IE
Edge
Safari
58
45
55
No
16
12.1
Mobile / Tablet
iOS Safari
Opera Mobile
Opera Mini
Android
Android Chrome
Android Firefox
12.2-12.4
46
No
76
78
68
So, we need to fall back to the event listener method in browsers where the Intersection Observer API is not supported. We have taken this into account in the example above.
CSS:

.my-class {
  background-image: url('/path/to/some/image.jpg');
  /* more styles */
}
CSS background images are not as straightforward as the image tag. To load them, the browser needs to build the DOM tree as well as the CSSOM tree to decide if the CSS style applies to a DOM node in the current document. If the CSS rule specifying the background image does not apply to an element in the document, then the browser does not load the background image. If the CSS rule is applicable to an element in the current document, then the browser loads the image.
Huh? This may seem complex at first, but this same behavior forms the basis of the technique for lazy loading background images. Simply put, we trick the browser into not applying the background-image CSS property to an element, till that element comes into the viewport.
Here is a working example that lazy loads a CSS background image.
One thing to note here is that the JavaScript code for lazy loading is still the same. We are still using the Intersection Observer API method with a fallback to the event listeners. The “trick” lies in the CSS.
We have an element with ID bg-image that has a background-image. However, when we add the lazy class to the element, we can override the background-image property by setting the value of it to none in the CSS.
Since an element with an ID and a class has higher specificity in CSS than an ID alone, the browser applies the property background-image: none to the element initially. When we scroll down, the Intersection Observer API (or event listeners, depending on which method you choose) detects that the image is in the viewport, it removes the lazy class from the element. This changes the applicable CSS and applies the actual background-image property to the element, triggering the load of the background image.
Chapter 5: Creating a Better User Experience With Lazy Loading
Lazy loading presents a great performance benefit. For an e-commerce company that loads hundreds of product images on a page, lazy loading can provide a significant improvement in initial page loads while decreasing bandwidth consumption.
However, a lot of companies do not opt for lazy loading because they believe it goes against delivering a great user experience (i.e. the initial placeholder is ugly, the load times are slow etc.).
In this section, we will try to solve some concerns around user experience with lazy loading of images.
Tip 1. Use the Right Placeholder
A placeholder is what appears in the container until the actual image is loaded. Normally, we see developers using a solid color placeholder for images or a single image as a placeholder for all images.
The examples we’ve looked at so far have used a similar approach: a box with a solid light gray background. However, we can do better to provide a more pleasing user experience. Below are some two examples of using better placeholders for our images.
Dominant Color Placeholder
Instead of using a fixed color for the image placeholder, we find the dominant color from the original image and use that as a placeholder. This technique has been used for quite some time by Google in its image search results as well as by Pinterest in its grid design.
Pinterest uses the dominant color of the image as the background color for image placeholders. (Source)
This might look complex to achieve, but Manuel Wieser has an elegant solution to accomplishing this by scaling down the image to down to a 1×1 pixel and then scale it up to the size of the placeholder—a very rough approximation but a simple, no-fuss way to get a single dominant color. Using ImageKit, the dominant color placeholder can be obtained using a chained transform in ImageKit as shown below.
<!-- Original image at 400x300 -->
<img src="https://ik.imagekit.io/demo/img/image4.jpeg?tr=w-400,h-300" alt="original image" />

<!-- Dominant color image with same dimensions -->
<img src="https://ik.imagekit.io/demo/img/image4.jpeg?tr=w-1,h-1:w-400,h-300" alt="dominant color placeholder" />
The placeholder image is just 661 bytes in size compared to the original image that is 12700 bytes—19x smaller. And it provides a nicer transition experience from placeholder to the actual image.
Here is a video demonstrating how this effect works for the user.
We can extend the above idea of using a dominant color placeholder further. Instead of using a single color, we use a very low-quality, blurred version of the original image as the placeholder. Not only does it look good, but it also gives the user some idea about what the actual image looks like and the perception that the image load is in progress. This is great for improving the perceived loading experience. This technique has been utilized by the likes of Facebook and Medium.
LQIP image URL example using ImageKit:
<!-- Original image at 400x300 -->
<img src="https://ik.imagekit.io/demo/img/image4.jpeg?tr=w-400,h-300" alt="original image" />

<!-- Low quality image placeholder with same dimensions -->
<img src="https://ik.imagekit.io/demo/img/image4.jpeg?tr=w-400,h-300,bl-30,q-50" alt="dominant color placeholder" />
The LQIP is 1300 bytes in size, still almost 10x smaller than the original image and a significant improvement in terms of visual experience over any other placeholder technique.
Here is a video demonstrating how this effect works for the user.
It is clear that using either dominant color or LQIP placeholders provides a smoother transition from the placeholder to the actual image, gives the user an idea of what is to come in place of that placeholder, and improves loading perception.
Tip 2: Add Buffer Time for Images to Load
When we discussed different methods to trigger image loads, we checked for the point of time where the image enters the viewport, i.e. the image load is triggered when the top edge of the image placeholder coincides with the bottom edge of the viewport.
The problem with this is that users might scroll really fast through the page and the image will need some time to load and appear on the screen. Combined with throttling possibly further delaying the load, the user may wind up waiting a few milliseconds longer for the image to show up. Not great for user experience!
While we can get a pretty good user experience using the Intersection Observer API for performance and LQIP for smoother transitions, there is another simple trick that you can use to ensure that the images are always loaded completely when they enter the viewport : introduce a margin to the trigger point for images.
Instead of loading the image exactly when it enters the viewport, load it when it’s, let’s say, 500px before it enters the viewport. This provides additional time, between the load trigger and the actual entry in the viewport, for the images to load.
With the Intersection Observer API, you can use the root parameter along with the rootMargin parameter (works as standard CSS margin rule), to increase the effective bounding box that is considered to find the intersection. With the event listener method, instead of checking for the difference between the image edge and the viewport edge to be 0, we can use a positive number to add some threshold.
If you watch the following screencast closely, you’ll notice that the fifth image in the sequence is loaded when the third image is in view. Similarly, the sixth image is loaded when the fourth is in view, and so on. This way, we are giving sufficient time for the images to load completely and, in most cases, the user won’t see the placeholder at all.
If you didn’t notice earlier, in all our examples, the third image (image3.jpg) is always loaded up front, even though it is outside the viewport. This was also done following the same principal: load slightly in advance instead of loading exactly at the threshold for better user experience.
Tip 3: Avoid Content Reflow
This is another trivial point, which if solved, can help maintain a good user experience.
When there is no image, the browser doesn’t know the size it will take up. And if we do not specify it using CSS, then the enclosing container would have no dimensions, i.e. it will be read as 0x0 pixels.
When the image loads, the browser will drop it into the screen and reflow the content to fit it. This sudden change in the layout causes other elements to move around and it is called content reflow, or shifting. Michael Scharnagl goes into great depth explaining how this creates an unpleasant user experience.
This can be avoided by specifying a height and/or width for the enclosing container so that the browser can paint the image container with a known height and width. Later, when the image loads, since the container size is already specified and the image fits into that perfectly, the rest of the content around that container does not move.
Tip 4: Avoid Lazy Loading Every Image
This is a mistake that developers often make because it’s super tempting to think that deferring image loads is good all the time. But, like life itself, it is possible to have too much of a good thing. Lazy loading might reduce the initial page load, but it also might result in a bad user experience if some images are deferred when they should not be.
We can follow some general principles to identify which images should be lazy loaded. For example, any image that is present in the viewport, or at the beginning of the webpage, should probably not be lazy loaded. This applies to any header image, marketing banner, logos, or really anything that the user would see when initially landing on a page. Also, remember that mobile and desktop devices will have different screen sizes and hence a different number of images that will be visible on the screen initially. You’ll want to take the device that’s being used into account and decide which resources to load up front and which to lazy load.
Another example is any image that is even slightly off the viewport in the initial load should not probably not be lazy loaded. This is going by the principle discussed above—load slightly in advance. So, let’s say any image that is 500px or a single scroll from the bottom of the viewport can be loaded up front as well.
One more example is if the page is short. It may be just a single scroll or a couple of scrolls, or perhaps there are less than five images outside the viewport. In these cases, you can probably leave lazy loading out altogether. It would not provide any significant benefit to the end user in terms of performance and the additional JavaScript that you load on the page to enable lazy loading will offset any potential gain you get from it.
Chapter 5: Lazy Loading’s Dependency on JavaScript
The entire idea of lazy loading is dependent on JavaScript being enabled and available in the user’s browser. While most of your users will likely have JavaScript enabled, it is essential to plan for cases where it is not.
You could either show a message telling users why the images won’t load and encourage them to either use a modern browser or enable JavaScript.
Another route is to use the noscript tag. However, this approach comes with some gotchas. This question thread on Stack Overflow does a great job addressing these concerns and is a recommended read for anyone looking to address this set of users.
Chapter 6: Popular JavaScript Libraries for Lazy Loading
Since environments and implementation details can vary across browsers and devices, you might want to consider a tried and tested library for lazy loading rather than spinning something up from scratch.
Here is a list of popular libraries and platform specific plugins that will allow you to implement lazy loading with minimal effort:
Yet Another Lazy Loader: This library uses the Intersection Observer API and falls back to event-based lazy loading for browsers that do not yet support it. This is great for just about any HTML element but unfortunately does not work on background images in CSS. The good news is that it supports IE back to version 11.
lazysizes: This is a very popular library with extensive functionality. It includes support for responsive image srcset and sizes attributes and provides superb performance even though it does not make use of the Intersection Observer API.
WordPress A3 Lazy Load: There are plenty of lazy loading WordPress plugins out there, but this one comes with a robust set of features, including a fallback when JavaScript is unavailable.
jQuery Lazy: A simple library that uses a jQuery implementation.
Once you have implemented lazy loading, you will likely want to check that it’s working as intended. The simplest way would be to open up the developer tools in your browser.
From there, go to Network > Images. When you refresh the page for the first time, you should only see loaded images in the list.
Then, as you start scrolling down the page, other image load requests would get triggered and loaded. You can also notice the timings for image load in the waterfall column in this view. It would help you identify image loading issues if any or issues in triggering the image load.
Another way would be to run the Google Chrome Lighthouse audit report on your page after you have implemented the changes and look for suggestions under the “Offscreen images” section.
Conclusion
We have covered a lot of ground about lazy loading images! Lazy loading—if implemented well—can have significant benefits on your site’s performance the loading performance while reducing the overall page size and delivery costs, thanks to deferring unnecessary resources up front.
So, what are you waiting for? Get started with lazy loading images now! And, if you need a little reminder of how this works, save a copy of the following infographic.
xs:code, a monetization platform for open source projects.
Why Monetize?
Open-source developers are not in it for the money. They create amazing software projects we all use every day, spending hundreds, if not thousands of hours of their spare time in the process. The reward? Recognition, a sense of accomplishment and bragging rights on their next job interview. This was enough for most developers for a long time, but in the past couple of years, and as commercial usage of open-source increased, we’ve seen growing frustration among developers, who are flooded by requests, bugs and questions – from people using their code for free. Some developers even got threats (!) from disgruntled users, demanding the developers fix a bug or implement a new feature they needed.
This frustration is increased, when developers see their open source projects are used to generate revenue for companies, while they are getting nothing for their talent, work and efforts. It seems unfair, and rightfully so. Developers need a way of getting the resources they need, to keep developing their projects. They need to be able to afford the time to work on their projects, get hosting servers, pay others to help out and more. Without any form of compensation from the people using their code – that is just not sustainable in the long run. So, the goal is not to get rich. The goal is getting the resources to build better software. Monetization is the way to achieve that goal.
The Challenges
Monetization is something that is usually out of the scope of what developers are interested in, and usually requires dealing with non-programming tasks such as setting up billing, handling payment processing and taxes, addressing legal issues and more. Because of the complexity involved, a lot of developers just give up before even trying. They don’t want to worry about financials and other corporate nightmares. They want to write code – not run a software company.
Besides the complexities of charging users for using their code, there are other aspects that make things even more complicated – how do you incentivize your users to pay while keeping your code open source? How do deal with other developers who contributed code to your project? Should they be compensated as well?
It’s a complicated task, and there are not a lot of easy solutions.
Why Not Use Donations?
To meet the monetization challenges, several donation platforms have emerged, offering developers to ask for donations from users using their code. That seems like the proper thing to do. If you are using a project for free and make money using it, you should be happy to donate to its creator, right? The reality is, unfortunately, that the overwhelming majority of companies using open source, do not donate at all. Because of the inherent nature of donations, being non-mandatory, no one has a strong incentive to donate, let alone on an ongoing basis. This makes donations a very limited way of monetizing, and many developers who tried it report that their revenue from donations is marginal, if not zero. Donations are an all-carrot-no-stick approach, and if developers need a steady stream of revenue to afford to make their projects better – they need something they can rely on. They need a stick to go with their carrot.
A New Way to Monetize
To overcome the barriers mentioned above, we at xs:code came up with a solution, that we believe can help make monetization so simple, that any open-source developer can start doing it today. xs:code is a platform that allows developers to offer subscription-based access to a private repository the keep on their Github account. Usually, open-source projects are kept in a public repository, freely accessible by anyone.
Our platform allows developers to keep another version of their project, that is connected to xs:code, and accessible only for users who pay for a subscription. The developer can decide how the two versions are different, and keep developing on Github as usual. The platform handles everything from billing, payment processing, invoicing and legal. The trick here is to make a smart decision on how the paid and free versions differ, so users have an incentive to pay. There are several options to do that, each with its own advantages.
Dual Licensing vs. Freemium
One option is often referred to as “dual licensing”. The developer keeps a version with a copyleft license (such as GPL) on his public Github repository, and the exact same code, with a permissive license (such as MIT), on his private repository. GPL licensed code, usually means the code cannot be used in commercial software, as it requires to change the entire code around it to GPL as well. That means companies using the open-source code will need to make their entire code base open source, and that is usually not viable most companies. MIT licensed code, can be used freely, no restrictions apply. If a company wants to use an open-source project with an MIT license, they would need to buy a subscription on xs:code.
Another option, usually called “freemium” or “Open core”, means that the developer keeps a “Lite” version on his Public repository, and another “Pro” or “Premium” version on his private repository. The “Pro” version can have more features, better support, paid hosting, or whatever the developer wants to offer.
There are many other options to separate the paid and free versions, and developers are only limited by their imagination and creativity to come up with ways to offer value to their brand new paying customers.
Paying Contributors
Code contributions are one of the key elements that made open source so incredible. When developers from all over the world contribute their time and talent to help make projects better – we all win. When the developer of a project starts to generate revenue from his code, it only makes sense the developers who contributed would also be entitled to their fair share. xs:code makes that simple, by allowing developers to grant contributors a percentage of their revenue. We see this as not only fair, but essential for keeping contributors motivated, and offering new contributors an opportunity to benefit from helping with making a project better.
Conclusion
Open source is an incredible thing. But without proper compensation for developers and contributors, it might not last – and that is bad for everyone involved in software development. In order to keep open source alive, a clear path of compensation for developers is crucial. I truly hope that our humble contribution to this cause would help make open source better – for all of us.
Interested in monetizing your project? Visit xscode.com
Notepad is among the most popular applications, and that is why Microsoft has included it in every version of Windows. It has a long history, and it has maintained a simple and clean interface. The simplicity of this text editor I use, and that is why most people have developed a preference over it. But wait? The developers keep on making improvements to suit your needs.
There is another text editor outside notepad, which is notepad ++. It has a bunch of features that allow you to complete more complex tasks. It has syntax folding, syntax highlighting when writing code and multi editing. Once you are in a good position to use notepad++ you will need WinRAR to help you compress storage required to store data by removing unnecessary data to pave the way for what you want to save. You can simply get it at rocketfiles.com.
Therefore with such an amazing text editor, you will not miss having its alternatives, and that is why in this article I will focus on its alternatives.
7 Best Notepad++ Alternatives
1. Brackets
his is a typical Text editor that offers unique tools for front end web developers and designers. It offers the following features:-
Features
It has support for an extension
It offers a live preview, which implies you can edit the code using the editors and as well preview it in the browser within the editor.
It is among the popular text editor across all the platforms since it is capable of supporting various programming languages. It is highly responsive such that it automatically resizes tab size when you open multiple tabs.
Features
It offers complete keyboard support
It is an open-source
It is not mandatory to purchase the license
No costs during installation
Pros
It has auto-indentation feature
It is easy to install and use
It has intelligence sense features
Cons
It lacks git plugins.
3. Atom
It is a free open source editor with lots of features. It is compatible with Linux, Windows, and Mac OS.
Features
It can autocomplete texts
It automatically identifies codes
It provides syntax highlighting
Pros
It is easy to install
Free, open-source editor
It offers several plugins to enhance its reflectiveness
It has an elegant interface
Cons
It is a bit slower when you compare to the other editors
It is large in size
4. Visual Studio Code
This is also another popular text editor that can support multiple programming languages. It is compatible with various operating systems, and it offers competent community support.
Features
It has an inbuilt feature which is done signed for file comparison
It is an open-source editor
It offers an inbuilt Git support
It can be installed across multiple operating systems
It supports user commands
Pros
It is easily customizable
It is light in weight
5. Netbeans
This is yet another text editor that is majorly used for Java development. It is an Integrated Development Environment that is based on the concept of modularity.
Features
It can autocomplete various texts
It automatically detects the codes
It has syntax highlighting features
Pros
It offers easy debugging feature
It is an open-source text editor
It is based on the modular concept
It is an ant-based project system
It can support maven
Cons
It is heavy
It offers less skin customization
6. TextMate
This is a typical text editor, which is an alternative for notepad++, and it can be used for general purposes. Here are some of its dominant features:-
Features
It is customizable
It provides syntax highlighting
It autocompletes texts
It automatically identifies codes
Pros
It has a live preview feature
It can list function in the current document
Cons
It can only be installed in Mac OS.
7. TextPad
This text editor was initially developers to be used in Microsoft OS by Helios Software solution. To be able to use it, you will have to purchase it.
Features
Supports multiple programming languages
It is capable of maintaining block indent
You can scroll multiple files synchronically
It offers automatic code identification
It automatically integrates JDK
Conclusion
Notepad++, which is available and free at rocketfiles.com, is popular because of its unique features. There are also alternatives that I have listed in this article that can actively perform similar tasks. You can use any of these editors for programming or general purposes. The good thing about most of these text editors is that they are easy to install and use. Most of them are also free except text pad, which you have to purchase it before using it. Generally, most of these text editors can compliment notepad ++ perfectly.
This article exemplifies methods for performing several tasks and queries over a set of records in a List.
Sometimes if you have a set of records in a List, it becomes quite easy to query on a list using a Lambda Expression. This article exemplifies methods for performing several tasks and queries over a list. Create a new console project and go to Program.cs See sample code below.
using System;
using System.Collections.Generic;
using System.Linq;
using System.Text;

namespace LamdaExpressionsOnList
{
    class Program
    {
        static void Main(string[] args)
        {
          //Your Code
        }
    }
}
Suppose we have a “Person” class that has the following members:
class Person
{
    public string SSN;
    public string Name;
    public string Address;
    public int Age;
    public Person(string ssn, string name, string addr, int age)
    {
        SSN = ssn;
        Name = name;
        Address = addr;
        Age = age;
    }
}
Now we create a list of the Person objects in which we have to perform several operations like finding a person on certain conditions, removing a person’s record etc. These types of operations can be easily performed using a “Lambda Expression”. We create the list and populate them in the following way:
List<Person> listPersonsInCity = new List<Person>();

listPersonsInCity.Add(new Person("203456876", "John", "12 Main Street, Newyork, NY", 15));

listPersonsInCity.Add(new Person("203456877", "SAM", "13 Main Ct, Newyork, NY", 25));

listPersonsInCity.Add(new Person("203456878", "Elan", "14 Main Street, Newyork, NY", 35));

listPersonsInCity.Add(new Person("203456879", "Smith", "12 Main Street, Newyork, NY", 45));

listPersonsInCity.Add(new Person("203456880", "SAM", "345 Main Ave, Dayton, OH", 55));

listPersonsInCity.Add(new Person("203456881", "Sue", "32 Cranbrook Rd, Newyork, NY", 65));

listPersonsInCity.Add(new Person("203456882", "Winston", "1208 Alex St, Newyork, NY", 65));

listPersonsInCity.Add(new Person("203456883", "Mac", "126 Province Ave, Baltimore, NY", 85));

listPersonsInCity.Add(new Person("203456884", "SAM", "126 Province Ave, Baltimore, NY", 95));
Now we see how we can do various complex operations on the list using a one-line simple Lambda expression.
1. The following code retrieves the first two persons from the list who are older than 60 years:
Console.WriteLine("\n-----------------------------------------------------------------------------");
Console.WriteLine("Retrieving Top 2 aged persons from the list who are older than 60 years\n");
foreach (Person person in listPersonsInCity.FindAll(e => (e.Age >= 60)).Take(2).ToList())
{
    Console.WriteLine("Name : " + person.Name + " \t\tAge: " + person.Age);
}
Console Output
2. The following code checks any person’s age that is between 13 and 19 years:
Console.WriteLine("\nChecking whether any person is teen-ager or not...");
if (listPersonsInCity.Any(e => (e.Age >= 13 && e.Age <= 19)))
{
    Console.WriteLine("Yes, we have some teen-agers in the list");
}
Console Output
3. The following code checks whether all the people’s ages are greater than Ten years or not:
Console.WriteLine("\nCheking whether all the persons are older than 10 years or not...");
if ( listPersonsInCity.All(e => (e.Age > 10)))
{
    Console.WriteLine("Yes, all the persons older than 10 years");
}
Console Output
4. The following code gets the average of all the people’s ages:
Console.WriteLine("\nGetting Average of all the person's age...");
double avgAge = listPersonsInCity.Average(e => e.Age);
Console.WriteLine("The average of all the person's age is: "+ avgAge);
5. The following code checks whether a person having the name ‘SAM’ exists or not:
Console.WriteLine("\nChecking whether a person having name 'SAM' exists or not...");
if (listPersonsInCity.Exists(e => e.Name == "SAM"))
{
    Console.WriteLine("Yes, A person having name  'SAM' exists in our list");
}
Console Output
6. The following code checks at what position a person having the name ‘Smith’ exists in the list:
Console.WriteLine("\nChecking the index position of a person having name 'Smith' ...");
int indexForSmith = listPersonsInCity.FindIndex(e => e.Name == "Smith");
Console.WriteLine("In the list, The index position of a person having name 'Smith' is : " + indexForSmith);
Console Output
7. The following code retrieves the oldest person in the list:
Console.WriteLine("\nGetting the name of the most aged person in the list ...");
Person p = listPersonsInCity.First(m=> m.Age == (listPersonsInCity.Max(e => e.Age)));
Console.WriteLine("The most aged person in our list is: "+ p.Name +" whose age is: "+ p.Age);
Console Output
8. The following code gets the total of all the people’s ages:
Console.WriteLine("\nGetting Sum of all the person's age...");
int sumOfAges = listPersonsInCity.Sum(e => e.Age);
Console.WriteLine("The sum of all the persons's age = "+ sumOfAges);
Console Output
9. The following code skips each person whose age is less than 60:
Console.WriteLine("\nSkipping every person whose age is less than 60 years...");
foreach (Person pers in listPersonsInCity.SkipWhile(e => e.Age < 60))
{
Console.WriteLine("Name : "+ pers.Name + " \t\tAge: "+ pers.Age);
}
Console Output
10. The following code retrieves all the people until we find a person with a name beginning with any letter other than “S” :
Console.WriteLine("Displaying the persons until we find a person with name starts with other than 'S'");
foreach (Person pers in listPersonsInCity.TakeWhile(e => e.Name.StartsWith("J")))
{
    Console.WriteLine("Name : " + pers.Name + " \t\tAge: " + pers.Age);
}
Console Output
11. The following code checks whether all the people have their SSN or not:
Console.WriteLine("\nChecking all the persons have SSN or not ...");
if(listPersonsInCity.TrueForAll(e => e.SSN != null))
{
    Console.WriteLine("No person is found without SSN");
}
Console Output
12. The following code removes all the people having the name “SAM”:
Console.WriteLine("\nRemoving all the persons record from list that have "SAM" name");
listPersonsInCity.RemoveAll(e => (e.Name == "SAM"));
if (listPersonsInCity.TrueForAll(e => e.Name != "SAM"))
{
    Console.WriteLine("No person is found with 'SAM' name in current list");
}
Console Output
13. The following code searches for the person having “203456876” as their SSN:
Console.WriteLine("\nFinding the person whose SSN = 203456876 in the list");
Person oPerson = listPersonsInCity.Find(e => (e.SSN == "203456876"));
Console.WriteLine("The person having SSN '203456876' is : " + oPerson.Name + " \t\tAge: " + oPerson.Age);
Console Output
Lambda Expressions are a powerful addition to C# Programming. This article attempts to describe lambda expressions in simple terms to pave the way for some powerful uses of this construct.
Looking for free photo editors like Photoshop to make photos and designs more professional? Adobe Photoshop is the dream of any designer and retoucher since it offers a professional toolset for creative process.
However, the biggest difficulty everyone faces is its quite high monthly price, which often becomes a deal-breaker and leads to many people searching for Photoshop torrents to avoid paying such a huge sum for Adobe products.
Luckily, it’s possible to find a photo editor like Photoshop that is either completely free or cheaper and is capable of doing almost everything that Photoshop can, and sometimes even more.
7 Photo Editors Like Photoshop
Even though Adobe Photoshop is often viewed as the best option among graphics editors, its capabilities are frequently superfluous. Other than that, Adobe is transferring more and more users to the “Cloud” system, which isn’t to everyone’s taste.
Finally, during the last few years, people have been complaining more and more about performance drops when using Adobe software due to the heavy load it puts on the processor. It’s often enough to open a couple of projects in Photoshop even on a powerful PC and you won’t even be able to use your browser comfortably.
Currently, Photoshop remains the leading choice among professionals, but more and more users are searching for decent free photo editors like Photoshop.
Here we have compiled list of some best photoshop alternatives.
1. Affinity Photo
Affinity Photo started to create a stir in the creative community almost from the moment it was released. It’s probably the most credible photo editor similar to Photoshop that we’ve seen to this day.
The program supports Photoshop’s signature file standards and is aimed at photographers and designers while costing significantly less.
Being completely compatible with Photoshop and other file formats, it targets specifically professional photographers and designers. While Affinity Photo is much cheaper than Photoshop (without a subscription), its creators state that their software is actually better, promising superior performance and fewer errors.
Frankly speaking, the performance boost you receive will probably highly depend on what hardware you’re using (the program was developed for using the latest quadcore technology).
Pros:
Works with RAW and PSD files
RGB, CMYK, LAB and Greyscale support
Layer-focused image editing
Cons:
Doesn’t have premade lens-specific corrections
Users can’t customize the workspace
Not very beginner-friendly
2. GIMP
If you want to get a free photoshop alternative that is just as powerful and multifunctional, then GIMP is one of the best alternatives. It is free, open-source, which allows a huge number of volunteers to continuously improve it.
Thanks to that fact, GIMP has loads of plugins and scripts written for it and it can also work with plugins for Adobe Photoshop. Another benefit of GIMP is that it appeared all the way back in the mid-90s so you can find a huge number of free courses and guides on the web.
GIMP offers a wide selection of tools and it’s a fantastic option if you’re looking for a free photo editor similar to Photoshop. The UI is slightly different from Photoshop’s but you can modify it to your liking.
If you find a “monstrous” program with huge system requirements and a scary price tag unappealing – GIMP is the option for you.
Pros:
Constant maintenance and updates that solve relevant issues and add new functions
Smooth performance on all platforms
Extremely versatile and easily customizable with plugins and scripts
Cons:
I didn’t experience any problems but heard some people suffer from a couple of bugs
Doesn’t support 16bit color channels
Some functions are in development for way too long
3. Photo Pos Pro
Photo Pos Pro is another decent photo editor like Photoshop that strives to be as user-friendly as possible. It has separate modes for beginners and advanced users. In beginner-mode, you can apply filters in a single click and perform basic photo corrections.
The professional mode has a UI similar to Photoshop. Most find its interface to be more intuitive and comprehensible than GIMP.
Alas, this free photo editor like Photoshop has a very serious flaw. The maximum size of saved files is limited to 1024×2014 pixels.
If you need to work with larger files, the photo editor will offer you to purchase the paid version for $20. That’s a bit unpleasant, but still several times cheaper than Photoshop.
Pros:
Capability to work with layers
All kinds of brushes, templates, textures and gradients
Tools for batch, manual and automatic color correction
Cons:
No way to create your own brushes
Rather poor printing preparation functionality
4. Pixlr Editor
Pixlr Editor is a rather unusual photo editor similar to Photoshop. It’s available in several versions, including PC, mobile and as an online editor. The web version is the sole reasonable Photoshop replacement since it’s the only one with layer support.
Sadly, the web version of this program can’t be set to full-screen since there will still be unused space on the right. However, that’s the only serious drawback of Pixlr Editor.
All tools found in Ps are available and work great. Overall, this is the perfect photo editor app like Photoshop for situations when you need to edit an image but you don’t have the right to install a downloadable editor.
Pros:
Available for free
Has its own smartphone app
Plenty of tools to work with
Cons:
Can be slightly overwhelming for beginners
Requires Internet connection
5. Pixelmator
Pixelmator is a universal graphics editor build on the principles of simplicity and accessibility for everyone. The program is available only on iOS and MacOS, which explains such an approach.
Pixelmator positions itself as a photo editor like Photoshop that is simpler and more intuitive.
Instead of a single workspace, here we have the main window and movable panels that you can open in the View menu or by using shortcuts. The number of picture editing tools isn’t large but won’t leave you complaining either.
I also want to mention the smart selection function that was added with the latest update. My subjective experience suggests that this option works better than in Photoshop and is slightly better visible.
There’s no need to impose this editor on professionals, but it’s a perfect fit for regular users. One of the most “magical” capabilities of Pixelmator is object removal. You pick the diameter of the selection, add a couple of brush strokes, and the photo will be cleared of any excess objects.
Pros:
Clean user-friendly UI
Large choice of effects other than photo adjustments
Drawing tools are efficient and error-free
Cons:
Doesn’t offer non-destructive editing or a history panel
No CMYK and RAW support
6. PaintNet
Paintnet represents a Windows-based free photo editor like Photoshop supplied by Microsoft. However, don’t let that fact scare you: despite being a default program, it’s a surprisingly multifunctional and useful tool.
This option focuses on ease of use and is better suited for photo editing than artistic creations. Nonetheless, it includes a variety of special effects that allow you to easily create an artificial perspective, mix and move pixels on the canvas, select and copy areas, etc.
A solid selection toolset, layer support and such settings as curves and brightness/contrast mean that PaintNet is a wonderful free photo editor similar to Photoshop, especially if you don’t need the latest additions to Ps’ toolset.
Pros:
Allows working with image layers
Updates come out almost every month
Contains a satisfying number of effects
Cons:
Lack of functions for professional graphics design
7. Adobe Photoshop Express
Adobe Photoshop Express can be considered a lighter, more limited version of Photoshop. This editor can be found online or as an app for Windows, iOS and Android. This is the simplest solution described in the article.
It doesn’t have layer support, plugins or brushes and works only with JPEG, JPG and JPE images below 16MB. You can’t even crop photos.
The only things you can find in this photo editor app like Photoshop are some basic settings and a collection of beautiful filters that you can use to enhance a photo before posting it on social media.
As you can see, it isn’t suited for deep photo editing so you might as well go with a trustworthy professional photo editing service online instead for a couple of backs.
Pros:
Incredibly easy to use
Availability of basic tools
Stable performance
Cons:
Lack of most professional tools
No RAW support
Max file size of 16MB
Conclusion
If you ever start thinking about replacing Photoshop, I hope you’ll take note of some of the offered programs. If you need to perform complex image editing that requires using many different tools, then Affinity Photo, GIMP or Pixelmator are perfectly suited for such a task. If all you need is to make a couple of simple adjustments (size change, rotation, basic color correction), then you should take a closer look at PaintNet or Photo Pos Pro.
If you need a photo editor like Photoshop that you can use online, straight from your browser – Pixlr and Adobe Photoshop Express are there for you. Interested in other Adobe products, read more about a legal way to download Lightroom free.
I hope you will love these photoshop alternatives. If you know about any other good editor then please mention in comments, I will love to add it to the list.
Earlier this year, at its Build developers conference, Microsoft announced that it was working on a web-based version of its Visual Studio IDE. At the time, Visual Studio Online went into a private preview, open to a select number of developers. Now, at its Ignite conference, the company has opened the service to all developers who want to give it a spin.
With Visual Studio Online, developers will be able to quickly spin up a fully configured development environment for their repositories. From there, they can use the web-based editor to work on their code.
“Visual Studio Online brings together Visual Studio, cloud-hosted developer environments and a web-based editor that’s accessible from anywhere to help developers be more productive than ever,” Microsoft notes in its press materials. “As development becomes more collaborative and open source workflows, like pull requests, become more pervasive, developers need to be able to switch between codebases and projects quickly without losing productivity.”
In its current form, the service is deeply integrated with Microsoft’s GitHub (no surprise there), but the company notes that developers can also attach their own physical and virtual machines to their Visual Studio-based environments. Developers also can create these online environments right from Visual Studio Code, the company’s increasingly popular free code editor for Windows, Mac and Linux.
The cloud-based environments, as well as extension support for Visual Studio Code, are now in preview.