

Dependency Injection is one of the most known techniques that help you to create more maintainable code. .NET Core provides you with extensive support to Dependency Injection, but it may not always be clear how to apply it. This tutorial will try to clarify the various Dependency Injection concepts and will introduce you to the support provided by .NET Core.
The Dependency Problem
Have you ever had to change a lot of code because of a new simple requirement? Have you ever had a hard time trying to refactor part of an application? Have you ever been in trouble writing unit tests because of components that required other components?
If you answered yes to any of these questions, maybe your codebase suffers from dependency. It’s a typical disease of the code of an application when its components are too coupled. In other words, when a component depends on another one in a too-tight way. The main effect of component dependency is the maintenance difficulty of the code, which, of course, implies a higher cost.
A dependency example
Take a look at a typical example of code affected by dependency. Start by analyzing these C# classes:
using System;
using System.Collections.Generic;

namespace OrderManagement
{
    public class Order
    {
        public string CustomerId { get; set; }
        public DateTime Date { get; set; }
        public decimal TotalAmount { get; set; }
        public List<OrderItem> Items { get; set; }

        public Order()
        {
            Items = new List<OrderItem>();
        }
    }

    public class OrderItem
    {
        public string ItemId { get; set; }
        public decimal Quantity { get; set; }
        public decimal Price { get; set; }
    }
}
This code defines two classes, Order and OrderItem, that represent the order of a customer. The orders are managed by the OrderManager class implemented as follows:
using System.Threading.Tasks;

namespace OrderManagement
{
    public class OrderManager
    {
        public async Task<string> Transmit(Order order)
        {
            var orderSender = new OrderSender();

            return await orderSender.Send(order);
        }
    }
}
The OrderManager class implements the Transmit() method, which sends the order to another service to process. It relies on the OrderSender class to actually send the order received as an argument.
This is the code implementing the OrderSender class:
using System.Net.Http;
using System.Text;
using System.Text.Json;
using System.Threading.Tasks;

namespace OrderManagement
{
    public class OrderSender
    {
        private static readonly HttpClient httpClient = new HttpClient();

        public async Task<string> Send(Order order)
        {
            var jsonOrder = JsonSerializer.Serialize<Order>(order);
            var stringContent = new StringContent(jsonOrder, UnicodeEncoding.UTF8, "application/json");

            //This statement calls a not existing URL. This is just an example...
            var response = await httpClient.PostAsync("https://mymicroservice/myendpoint", stringContent);

            return response.Content.ReadAsStringAsync().Result;

        }
    }
}
As you can see, the Send() method of this class serializes the order and send it via HTTP POST to a hypothetical microservice that will process it.
The code shown here is not meant to be realistic. It is just a rough example.
What happens if you need to change the way of sending an order? For example, suppose you also want to send orders via e-mail or to send them to another microservice that uses gRPC instead of HTTP. Also, how comfortable do you feel to create a unit test for the OrderManager class?
Since OrderManager depends on OrderSender, you will be forced to change in some way both classes to support multiple sender types. Changes in the lower-level component (OrderSender) may affect the higher-level component (OrderManager). Even worse, it will be almost impossible to automatically test the OrderManager class without risking to mess your code.
This is just a simple study case. Think of the impact that dependency may have in a more complex scenario with many dependent components. That could really become a huge mess.
The Dependency Inversion Principle
The last of the SOLID principles proposes a way to mitigate the dependency problem and make it more manageable. This principle is known as the Dependency Inversion Principle and states that:
- High-level modules should not depend on low-level modules. Both should depend on abstractions
- Abstractions should not depend on details. Details should depend on abstractions.
You can translate the two formal recommendations as follows: in the typical layered architecture of an application, a high-level component should not directly depend on a lower-level component. You should create an abstraction (for example, an interface) and make both components depend on this abstraction.
Translated in a graphical way, it appears as shown by the following picture:
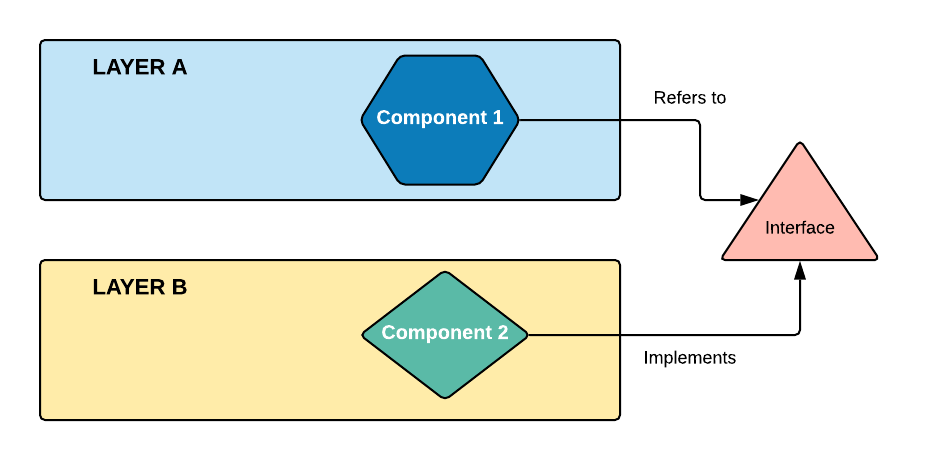
Of course, all of this may seem too abstract. Well, this article will provide you with examples to clarify the concepts about dependency and the techniques to mitigate it. While the general concepts are valid for any programming language and framework, this article will focus on the .NET Core framework and will illustrate the infrastructure it provides you to help in reducing component dependency.
A trip in the dependency lingo
Before exploring what .NET provides you to fight the dependency disease of your code, it’s necessary to put some order in the terminology. You may have heard many terms and concepts about code dependency, and some of them seem to be very similar and may have been confusing. Well, here is an attempt to give a proper definition of the most common ones:
- Dependency Inversion Principle: it’s a software design principle; it suggests a solution to the dependency problem but does not say how to implement it or which technique to use.
- Inversion of Control (IoC): this is a way to apply the Dependency Inversion Principle. Inversion of Control is the actual mechanism that allows your higher-level components to depend on abstraction rather than the concrete implementation of lower-level components.Inversion of Control is also known as the Hollywood Principle. This name comes from the Hollywood cinema industry, where, after an audition for an actor role, usually the director says, don’t call us, we’ll call you.
- Dependency Injection: this is a design pattern to implement Inversion of Control. It allows you to inject the concrete implementation of a low-level component into a high-level component.
- IoC Container: also known as Dependency Injection (DI) Container, it is a programming framework that provides you with an automatic Dependency Injection of your components.
Dependency Injection approaches
Dependency Injection is maybe the most known technique to solve the dependency problem.
You can use other design patterns, such as the Factory or Publisher/Subscriber patterns, to reduce the dependency between components. However, it mostly derives on the type of problem your code is trying to solve.
As said above, it is a technique to providing a component with its dependencies, preventing the component itself from instantiating by themselves. You can implement Dependency Injection on your own by creating instances of the lower-level components and passing them to the higher-level ones. You can do it using three common approaches:
- Constructor Injection: with this approach, you create an instance of your dependency and pass it as an argument to the constructor of the dependent class.
- Method Injection: in this case, you create an instance of your dependency and pass it to a specific method of the dependent class.
- Property Injection: this approach allows you to assign the instance of your dependency to a specific property of the dependent class.
.NET Core and the Dependency Injection
You can implement Dependency Injection manually by using one or more of the three approaches discussed before. However, .NET Core comes with a built-in IoC Container that simplifies Dependency Injection management.
The IoC Container is responsible for supporting automatic Dependency Injection. Its basic features include:
- Registration: the IoC Container needs to know which type of object to create for a specific dependency; so, it provides a way to map a type to a class so that it can create the correct dependency instance.
- Resolution: this feature allows the IoC Container to resolve a dependency by creating an object and injecting it into the requesting class. Thanks to this feature, you don’t have to instantiate objects manually to manage dependencies.
- Disposition: the IoC Container manages the lifetime of the dependencies following specific criteria.
You will see these features in action in a while. But before this, some basic information is needed.
The .NET Core built-in IoC Container implements the IServiceProvider interface. So if for some reason, you want to create your own IoC Container, you should implement this interface. In .NET Core, the dependencies managed by the container are called services. You have two types of services:
- Framework services: these services are part of the .NET Core framework; some examples of framework services are
IApplicationBuilder,IConfiguration,ILoggerFactory, etc. - Application services: these are the services that you create in your application; since the IoC doesn’t know them, you need to register them explicitly.
Dealing with Framework Services
As a .NET Core developer, you’ve already used the built-in IoC Container to inject framework services. Indeed, .NET Core heavily relies on it. For example, the Startup class in an ASP.NET application uses Dependency Injection extensively:
public class Startup
{
    public Startup(IConfiguration configuration)
    {
            // ... code ...
    }

    public void Configure(IApplicationBuilder app, IWebHostEnvironment env)
    {
            // ... code ...
    }

        // ... code ...
}
In this example, the Startup() constructor requires a configuration parameter implementing the IConfiguration type. Since IConfiguration is one of the framework service types, the IoC Container knows how to create an instance of it and inject it into the Startup class applying the Constructor Injection approach. The same applies to the Configure() method. Keep in mind, however, that only the following framework service types can be injected in the Startup() constructor and in the Configure() method of a standard ASP.NET application: IWebHostEnvironment, IHostEnvironment, and IConfiguration. This is a special case for framework services because you don’t need to register them.
Registering framework services
In general, you have to register services needed by your ASP.NET application in the ConfigureServices() method of the Startup class. This method has an IServiceCollection parameter representing the list of services your application depends on. Practically, the collection represented by this parameter allows you to register a service in the IoC Container. Consider the following example:
public class Startup
{
         // ... code ...
    public void ConfigureServices(IServiceCollection services)
    {
        services.AddAuthentication(options =>
            {
                options.DefaultAuthenticateScheme = JwtBearerDefaults.AuthenticationScheme;
                options.DefaultChallengeScheme = JwtBearerDefaults.AuthenticationScheme;
            });
    }

        // ... code ...
}
Here, you are registering a dependency for managing authentication for your application. In this specific case, you are using the extension methodAddAuthentication() with the parameters describing the authentication type you want to use. The framework provides extension methods to register and configure dependencies for the most common services. It also provides the Add() method to register generic dependencies, as in the following example:
public class Startup
{
         // ... code ...
    public void ConfigureServices(IServiceCollection services)
    {
        services.Add(new ServiceDescriptor(typeof(ILog), new MyLogger()));
    }

        // ... code ...
}
In this case, you are registering a log service implementing the ILog interface. The second parameter of the Add() method is an instance of the MyLogger class you have implemented in your project. As you may guess, this registration creates a singleton service, i.e., a single instance of the MyLogger class that will fulfill any requests coming from your application.
Service lifetimes
This single instance of your dependency will live for the entire lifetime of your application. This may be suitable for a service like a logger, but it is unacceptable for other services. The IoC Container allows you to control the lifetime of a registered service. When you register a service specifying a lifetime, the container will automatically dispose of it accordingly. You have three service lifetimes:
- Singleton: this lifetime creates one instance of the service. The service instance may be created at the registration time by using the
Add()method, as you saw in the example above. Alternatively, the service instance can be created the first time it is requested by using theAddSingleton()method. - Transient: by using this lifetime, your service will be created each time it will be requested. This means, for example, that a service injected in the constructor of a class will last as long as that class instance exists. To create a service with the transient lifetime, you have to use the
AddTransient()method. - Scoped: the scoped lifetime allows you to create an instance of a service for each client request. This is particularly useful in the ASP.NET context since it allows you to share the same service instance for the duration of an HTTP request processing. To enable the scoped lifetime, you need to use the
AddScoped()method.
Choosing the right lifetime for the service you want to use is crucial both for the correct behavior of your application and for better resource management.
Managing Application Services
Most of the concepts you learned from framework services are still valid for your application services. However, framework services are already designed to be injectable. The classes you define in your application need to be adapted to leverage Dependency Injection and integrate with the IoC Container.
To see how to apply the Dependency Injection technique, recall the order management example shown early in this article and assume that those classes are within an ASP.NET application. You can download the code of that application from this GitHub repository by typing the following command in a terminal window:
git clone -b starting-point --single-branch https://github.com/sniper57/dependency-injection-dotnet-coreThis command will clone in your machine just the branch starting-point of the repository. After cloning the repository, you will find the dependency-injection-dotnet-core folder on your machine. In this folder, you have the OrderManagementWeb subfolder containing the ASP.NET Core project with the classes shown at the beginning of this article. In this section, you are going to modify this project to take advantage of the Dependency Injection and the built-in IoC Container.
Defining the abstractions
As the Dependency Inversion Principle suggests, modules should depend on abstractions. So, to define those abstractions, you can rely on interfaces.
Add a subfolder to the OrderManagementWeb folder and call it Interfaces. In the Interfaces folder, add the IOrderSender.cs file with the following content:
// OrderManagementWeb/Interfaces/IOrderSender.cs

using System.Threading.Tasks;
using OrderManagement.Models;

namespace OrderManagement.Interfaces
{
    public interface IOrderSender
    {
        Task<string> Send(Order order);
    }
}
This code defines the IOrderSender interface with just one method, Send(). Also, in the same folder, add the IOrderManager.cs file with the following interface definition:
// OrderManagementWeb/Interfaces/IOrderManager.cs

using System.Threading.Tasks;
using OrderManagement.Models;

namespace OrderManagement.Interfaces
{
    public interface IOrderManager
    {
        public Task<string> Transmit(Order order);
    }
}
The above code defines the IOrderManager interface with the Transmit() method.
Depending on the abstractions
Once defined the abstractions, you have to make your classes depending on them instead of the concrete class instances. As a first step, you need to redefine the OrderSender class so that it implements the IOrderSender interface. You also rename the class into HttpOrderSender to point out that this implementation sends the order via HTTP. So, open the OrderSender.cs file in the Managers folder and replace its content with the following:
// OrderManagementWeb/Managers/OrderSender.cs

using System.Net.Http;
using System.Text;
using System.Text.Json;
using System.Threading.Tasks;
using OrderManagement.Interfaces;
using OrderManagement.Models;

namespace OrderManagement
{
    public class HttpOrderSender : IOrderSender
    {
        private static readonly HttpClient httpClient = new HttpClient();

        public async Task<string> Send(Order order)
        {
            var jsonOrder = JsonSerializer.Serialize<Order>(order);
            var stringContent = new StringContent(jsonOrder, UnicodeEncoding.UTF8, "application/json");

            //This statement calls a not existing URL. This is just an example...
            var response = await httpClient.PostAsync("https://mymicroservice.lan/myendpoint", stringContent);

            return response.Content.ReadAsStringAsync().Result;

        }
    }
}
Now, you need to redefine also the OrderManager class so that it implements the IOrderManager interface. Open the OrderManager.cs file in the Managers folder and replace its content with the following:
// OrderManagementWeb/Managers/OrderManager.cs

using System.Threading.Tasks;
using OrderManagement.Interfaces;
using OrderManagement.Models;

namespace OrderManagement
{
    public class OrderManager : IOrderManager
    {
        private IOrderSender orderSender;

        public OrderManager(IOrderSender sender)
        {
            orderSender = sender;
        }

        public async Task<string> Transmit(Order order)
        {
            return await orderSender.Send(order);
        }
    }
}
You may notice that, differently from the previous version of the class, the Transmit() method no longer creates an instance of the OrderSender class. The dependency is now accessed via the class constructor.
With these changes, you broke the dependency between the OrderManager and the HttpOrderSender classes. Now, the OrderManager depends on the IOrderSender interface, i.e., its abstraction.
Registering the dependencies
Now you need to tell the IoC Container how to manage the dependencies based on the abstraction you have defined. In other words, you need to register the dependencies. As said, this registration happens in the Startup class of the project. So, open the Startup.cs file and replace the ConfigureServices() method with the following:
// OrderManagementWeb/Startup.cs

public class Startup
{
    // ...code ...

        public void ConfigureServices(IServiceCollection services)
        {
            services.AddControllers();

            services.AddScoped<Interfaces.IOrderSender, HttpOrderSender>();
            services.AddScoped<Interfaces.IOrderManager, OrderManager>();
        }

    // ...code ...

}
As you can see, you registered the dependencies by using the generic version of the AddScoped() method. Here you are asking the IoC Container to create an instance of the HttpOrderSender class whenever a request for the IOrderSender type is detected. Similarly, it should create an instance of the OrderManager class when theIOrderManager type is requested.
Note that even the
AddController()method is an extension method provided byMicrosoft.Extensions.DependencyInjectionlibrary that registers services for the Web API controllers.
Injecting the dependencies
Now it’s time to actually use all these dependencies. So, open the OrderController.cs file in the Controllers folder and replace its content with the following code:
// OrderManagementWeb/Controllers/OrderController.cs

using Microsoft.AspNetCore.Mvc;
using OrderManagement.Interfaces;
using OrderManagement.Models;

namespace OrderManagement.Controllers
{
    [Route("api/[controller]")]
    [ApiController]
    public class OrderController : ControllerBase
    {
        private IOrderManager orderManager;

        public OrderController(IOrderManager orderMngr)
        {
            orderManager = orderMngr;
        }

        [HttpPost]
        public ActionResult<string> Post(Order order)
        {
            return Ok(orderManager.Transmit(order));
        }
    }
}
The new version of the Web API controller defines a private orderManager variable. Its value represents the instance of a service implementing the IOrderManager interface. The value of this variable is assigned in the constructor, which has an IOrderManager type parameter. With this parameter, the constructor is requesting the IoC Container a service instance of that type. The IoC Container searches in its service collection a registration that can satisfy this request and passes such an instance to the controller. But that’s not all. The IoC Controller also looks for other indirect dependencies and resolve them. This means that while creating the instance of the OrderManager class, the IoC Container also resolves its internal dependency on the IOrderSender abstraction. So you don’t have to worry about indirect dependencies: they are all resolved under the hood simply because the Web API controller declared to need a registered service.
As you noticed in these examples, the Constructor Injection is the default approach used by the IoC Container to inject dependencies in a class. If you want to use the Method Injection approach, you should request it explicitly by using the FromServices attribute. This example shows how you could use this attribute:
[HttpPost]
public ActionResult<string> Post([FromServices]IOrderManager orderManager)
{
    return Ok(orderManager.Transmit(order));
}
The third injection approach, the Property Injection, is not supported by the built-in IoC Container.
Dependency Injection in a Console Application
In the previous section, you implemented Dependency Injection for an ASP.NET Web application. You followed a few steps to register and get your dependencies automatically resolved by the built-in IoC Container. However, you may still feel something magic in the way it happens since the ASP.NET Core infrastructure provides you with some implicit behaviors. However, the Dependency Injection mechanism provided by the IoC Container is not just for Web applications. You can use it in any type of application.
In this section, you will learn how to leverage the IoC infrastructure in a console application, and some behaviors that may still look obscure will be hopefully clarified. So, move in the dependency-injection-dotnet-core folder you created when cloned the ASP.NET application and run the following command in a terminal window:
dotnet new console -o OrderManagementConsoleThis command creates an OrderManagementConsole folder with a basic console application project. Now, copy in the OrderManagementConsole folder the Interfaces, Managers, and Models folders from the ASP.NET project you modified in the previous section. Basically, you are reusing the same classes related to the order management process you defined in the ASP.NET project.
After this preparation, the first step to enable your console application to take advantage of the IoC Container is to add the Microsoft.Extensions.DependencyInjection package to your project with the following command:
dotnet add package Microsoft.Extensions.DependencyInjection Then, you have to write some code to set up the IoC Container in your console application. Open the Program.cs file and replace its content with the following:
// OrderManagementConsole/Program.cs

using System;
using Microsoft.Extensions.DependencyInjection;
using OrderManagement;
using OrderManagement.Interfaces;
using OrderManagement.Models;

namespace OrderManagementConsole
{
    class Program
    {
        private static IServiceProvider serviceProvider;

        static void Main(string[] args)
        {
            ConfigureServices();

            var orderManager = serviceProvider.GetService<IOrderManager>();
            var order = CreateOrder();

            orderManager.Transmit(order);
        }

        private static void ConfigureServices()
        {
            var services = new ServiceCollection();

            services.AddTransient<IOrderSender, HttpOrderSender>();
            services.AddTransient<IOrderManager, OrderManager>();

            serviceProvider = services.BuildServiceProvider();
        }

        private static Order CreateOrder()
        {
            return new Order {
                CustomerId = "12345",
                Date = new DateTime(),
                TotalAmount = 145,
                Items = new System.Collections.Generic.List<OrderItem>
                {
                    new OrderItem {
                        ItemId = "99999",
                        Quantity = 1,
                        Price = 145
                    }
                }
            };
        }
    }
}
You see that the first operation in the Main() method of the Program class is configuring the services. Taking a look at the ConfigureServices() method, you see that this time you have to create the services collection explicitly. Then, you register your services with the transient lifetime: the dependencies should live just the time needed to manage the order. Finally, you get the service provider by using the BuildServiceProvider() method of the services collection and assign it to the serviceProvider private variable.
You use this service provider to get an instance of a registered service. For example, in the Main() method, you get an instance of the IOrderManager service type by using the GetService<IOrderManager>() method. From now on, you can use this instance to manage an order. Of course, as in the ASP.NET case, the orderManager instance has any indirect dependency resolved.
Finally, the CreateOrder() method just creates a dummy order to be passed to the Transmit() method of the order manager.
Summary
This article tried to clarify some concepts related to the Dependency Injection design pattern and focused on the infrastructure provided by .NET Core to support it. After introducing a few general definitions, you learned how to configure an ASP.NET Core application to use the built-in IoC container and register framework services. Then, you adapted the classes of an ASP.NET application to apply the Dependency Inversion Principle and discovered how to register your dependency in the IoC Container specifying the desired lifetime. Finally, you saw how to use the IoC Container even in a console application.
You can find the full source code discussed in this article in this GitHub repository.